LLM - API
背景
- LLM 是没有 Web API 的,需要进行一次封装
- 将 LLM 的核心接口封装成 Web API 来为用户提供服务 - 必经之路
接口封装
FastAPI
接口封装
Uvicorn + FastAPI
- Uvicorn 类似于 Tomcat,但比 Tomcat 轻量很多,作为 Web 服务器
- 允许异步处理 HTTP 请求,非常适合处理并发请求
- 基于 uvloop 和 httptools,具备非常高的性能
- FastAPI 类似于 SpringBoot,同样比 SpringBoot 轻量很多,作为 API 框架
- 结合 Uvicorn 和 FastAPI
- 可以构建一个高性能的、易于扩展的异步 Web 应用程序
- Uvicorn 作为服务器运行 FastAPI 应用,可以提供优异的并发处理能力
安装依赖
1 | $ pip install fastapi |
代码分层
1 | import uvicorn |
1 | $ curl -s 127.0.0.1:8888 | jq |
模型定义
在 Python 中使用 Pydantic 模型来定义数据结构
Pydantic - 数据验证 + 数据管理 - 类似于 Java Validation
1 | import uvicorn |
- BaseModel 为了数据验证和管理而设计的
- 当继承 BaseModel 后,将自动获得数据验证、序列化和反序列化的功能
项目结构
1 | project_name/ |
路由集成
FastAPI 通过 include_router 将不同的路由集成到主应用中
1 | ├── app |
chat_schema.py
1 | from pydantic import BaseModel, Field |
chat_service.py
1 | from schemas.chat_schema import ChatMessage |
chat_controller.py
1 | from fastapi import APIRouter |
main.py
1 | import uvicorn as uvicorn |
test_chat_controller.py
1 | import json |
LLM
不同的 LLM 对应的对话接口不一样
懒加载
1 | from transformers import AutoTokenizer, AutoModelForCausalLM |
Chat
一次性输出 LLM 返回的内容
1 | from datetime import datetime |
Stream Chat
model.stream_chat()
1 | 我 |
1 | 我 |
通过 stream 变量控制是否流式输出
1 | if stream: |
stream=true
1 | data: {"text": "你", "message_id": "80b2af55c5b7440eaca6b9d510677a75"} |
stream=false
1 | data: {"text": "你好!我是人工智能助手,很高兴为您服务。请问有什么问题我可以帮您解答吗?", "message_id": "741a630ac3d64fd5b1832cc0bae6bb68"} |
接口调用
- 在工程化实践中,一般会将与 AI 相关的逻辑封装在 Python 应用中
- 上层应用一般通过其它语言实现 - Java / Go
Java
Java -> Python,基于 OkHttp 实现 Server-Sent Events

JavaScript
JavaScript -> Java,基于 EventSource 实现 Server-Sent Events
1 | <script> |
All articles on this blog are licensed under CC BY-NC-SA 4.0 unless otherwise stated.
Related Articles
2024-06-26
LLM - Prompt
Prompt 是否充分使用好 AI 大模型,提示是关键 OpenAI question / answer prompt / completion - 给 LLM 一个提示,让 LLM 进行补全 LLM 训练原理 GPT 系列模型基于 Transformer 架构的解码器机制,使用自回归无监督方式进行预训练 训练过程 - 大量的文本输入,不断进行记忆 相比于监督学习,训练效率更低,但训练过程简单,可以喂大量的文本语料,上限比较高 completion 根据训练过的记忆,一个字一个字地计算概率,取概率最大的那个字进行输出 因此有人吐槽 LLM 输出很慢 - 逐字计算并输出 Prompt Engineering 需求描述越详细越准确,LLM 输出的内容就越符合要求 Prompt Engineering 是一门专门研究与 LLM 交互的新型学科 通过不断地开发和优化,帮助用户更好地了解 LLM 的能力和局限性 探讨如何设计出最佳提示,用于指导 LLM 帮助我们高效完成某项任务 不仅仅是设计和研发提示,还包含了与 LLM 交互的各种技能和技术 在实现与 LLM 交互、...
2024-07-04
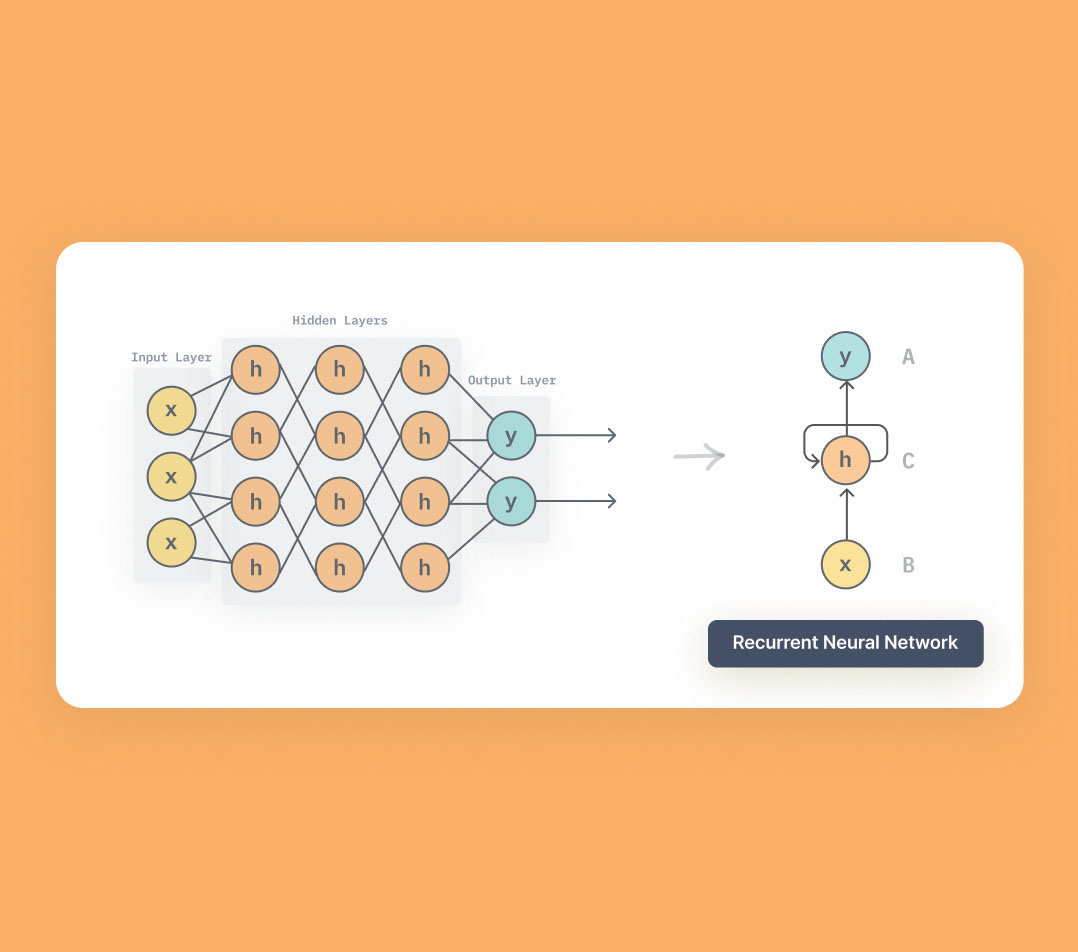
LLM Core - RNN
背景 RNN 主要用来处理序列数据,目前大部分 LLM 都是基于 Transformer 通过学习 RNN,有助于理解 Transformer 有助于理解神经网络如何处理序列中的依赖关系、记忆过去的信息,并在此基础上生成预测 有助于理解关键问题 - 梯度消失 / 梯度爆炸 RNN Recurrent neural network - 循环神经网络 RNN 是一类用于处理序列数据的神经网络,RNN 能够处理序列长度变化的数据 - 文本 / 语音 RNN 的特点是在模型中引入了循环,使得网络能够保持某种状态,表现出更好的性能 左边 $x$ 为输入层,$o$ 为输出层,中间的 $s$ 为隐藏层,在 $s$ 层进行一个循环 $W$ 右边(展开循环) 与时间 $t$ 相关的状态变化 神经网络在处理数据时,能看到前后时刻的状态,即上下文 RNN 因为隐藏层有时序状态,那么在推理的时候,可以借助上下文,从而理解语义更加准确 优劣优势 RNN 具有记忆能力,通过隐藏层的循环结构来捕捉序列的长期依赖关系 特别适用于文本生成、语音识别等领域 局限 存在梯度消失和梯度爆炸的...
2024-07-07
LLM Core - Seq2Seq
简单介绍 Word2Vec 的主要能力是将词汇放在多维空间中,相似的词汇会被放在邻近的位置 Seq2Seq 不仅能理解词汇,还能将词汇串联成完整的句子 Seq2Seq 即从一个序列到另一个序列的转换 不仅仅能理解单词之间的关系,还能把整个句子的意思打包,并解压成另一种形式的表达 Seq2Seq 的核心角色 - 编码器(Encoder) + 解码器(Decoder) Role Desc Encoder 理解和压缩信息 - 把一封长信函整理成一个精简的摘要 Decoder 将摘要打开,并翻译成另一种语言或形式的完整信息 优缺点Seq2Seq 固定长度上下文 + 逐步输入(长序列) + 参数规模小 Seq2Seq 是一种比较高级的神经网络模型,适用于语言翻译,甚至是基本的问答系统 Seq2Seq 使用固定的上下文长度,因此长距离依赖的能力比较弱 Seq2Seq 的训练和推理通常需要逐步处理输入和输出序列,在处理长序列会受限 Seq2Seq 的参数量通常较少,在面对复杂场景时,模型性能可能会受限 Word2Vec 基本概念 Seq2Seq 是一种神经网络架构,模型的核心组成 ...
2024-06-30
LLM RAG - ChatGLM3-6B + LangChain + Faiss
RAG 使用知识库,用来增强 LLM 信息检索的能力 知识准确 先把知识进行向量化,存储到向量数据库中 使用的时候通过向量检索从向量数据库中将知识检索出来,确保知识的准确性 更新频率快 当发现知识库里面的知识不全时,可以随时补充 不需要像微调一样,重新跑微调任务、验证结果、重新部署等 应用场景 ChatOps 知识库模式适用于相对固定的场景做推理 如企业内部使用的员工小助手,不需要太多的逻辑推理 使用知识库模式检索精度高,且可以随时更新 LLM 基础能力 + Agent 进行堆叠,可以产生智能化的效果 LangChain-Chatchat组成模块 模块 作用 支持列表 大语言模型 智能体核心引擎 ChatGLM / Qwen / Baichuan / LLaMa Embedding 模型 文本向量化 m3e-* / bge-* 分词器 按照规则将句子分成短句或者单词 LangChain Text Splitter 向量数据库 向量化数据存储 Faiss / Milvus Agent Tools 调用第三方...
2024-07-05
LLM Core - NLP
基础 NLP 的研究目的是让计算机能够理解、解释和生成人类语言,一般包含 4 个步骤 Step Desc 文本预处理 将原始文本转换成机器容易理解的格式分词(单词或短语)、去除停用词、词干提取、词性标注等 特征提取 从处理过的文本中提取特征,以便用于机器学习模型将文本转换成数值形式 - 向量化 - 词袋模型 or 词嵌入 模型训练 使用提取到的特征和相应的机器学习算法来训练模型分类器、回归模型、聚类算法等 评估与应用 评估模型的性能,并在实际应用中使用模型来解释、生成或翻译文本 应用场景 - 搜索引擎 / 语音转换 / 文本翻译 / 系统问答 ML vs NLP Scope Desc ML 让计算机通过查看大量的例子来学习如何完成任务 NLP 教会计算机理解和使用人类语言 ML + NLP 用机器学习的技术来让计算机学习如何处理和理解语言 文本预处理 将原始文本转换成易于机器理解和处理的格式 文本清洗 去除噪音(对分析无关紧要的部分)及标准化文本 123456789101112131415161718impor...
2024-07-08
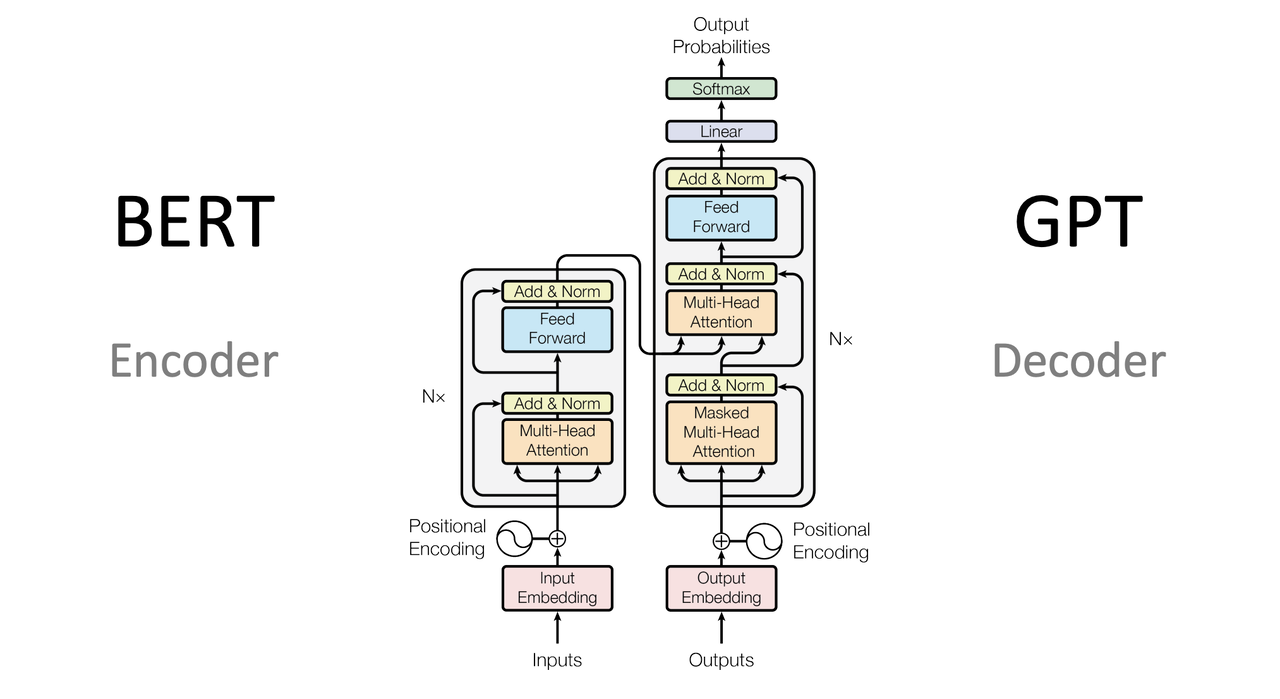
LLM Core - Transformer
背景 不论是 GRU 还是 LSTM 都面临梯度消失和梯度爆炸的问题 RNN 必须按照顺序处理序列中的每个元素,无法并发处理 RNN 还有长依赖问题,虽然可以处理长序列,但实战效果不佳 Attention Is All You Need - http://arxiv.org/pdf/1706.03762 简单介绍 Transformer 是一种基于自注意力机制的深度学习模型,诞生于 2017 年 目前大部分的语言模型(如 GPT 系列、BERT系列)都基于 Transformer 架构 Transformer 摒弃了之前序列处理任务中广泛使用的 RNN 转而使用自注意力层来直接计算序列内各元素之间的关系,从而有效捕获长距离依赖 Transformer 明显提高了处理速度 Transformer 由于其并行计算的特性,大幅度提升了模型在处理长序列数据时的效率 Transformer 由编码器和解码器组成 每个部分均由多层重复的模块构成,其中包括自注意力层和前馈神经网络 优势 Transformer 通过其独特的架构设计,在效率、效果和灵活性方面提供了显著优势使其成为处理复杂序列数据任...