Infrastructure - Authentication - Scheme
Concept
Secrets and Keys
Authentication is the art of unlocking things with a secret. At the heart of every authentication is a shared secret!
- The secret has two copies.
- One copy is with the system and the other copy is with you.
- Your copy is what is called the private key.
- The server only has a highly encrypted version of the secret; it doesn’t know what the decrypted value would look like.
- That’s why if you forget your password, you’d need to reset it.
- Public and Private Keys
- Your copy which is the private key, and the other is the public key that’s accessible to anyone.
Factors
Factors authenticate you by who you are, what do you know, and what do you have.
In addition to username and password, authentication can include additional information called factors.
- Single Factor
- this is the username and password that we talked about. This is the “who you are” type of auth.
- Two Factor
- Along with the username and password, you need to answer another secret question that you set up while signing up. So you have 2 secrets keys. One for who you are and the other for what you know.
- Multi-Factor Authentication (MFA)
- This is the hardest to crack.
- When you use your first secret key, the server sends you another secret key to the secret location that you mutually agreed on during the sign-up process (usually people set this as their phone number or their email address). This second secret key is usually valid for only a few minutes.
- This takes care of who you are, and what you have (the cell phone) type of auth.
- Biometric authentication
- This is the fingerprint ID that is becoming a common part of authenticating on the mobile.
- This is an automated “who you are” type of auth where you’re not required to manually type in a username and password.
- Captchas
- One where you have to decipher the squiggly words that you see and type those in.
- The other where you have to identify mountains, or cars, or storefronts, or any number of things in a grid of pictures.
Authentication and Authorization
- Authentication happens before Authorization.
- Authentication gets you logged into the server.
- Authentication is negotiated with usernames, passwords, and other factors we talked about.
- Authorization gets you access to the resources on the server.
- Authorization is negotiated based on policies on the account.
Scheme
Being stateless, the REST API can’t remember your credentials. So you have to tell it who you are every time you talk to it!
Basic Authentication
- Have the user type in a username and a password to identify themselves every time you send in a request.
- In the standard HTTP specification, there is an Authorization header field that can be used for this purpose. The username and password are encoded with Base 64 encoding.
- The interceptor can copy that gibberish and stick it into an online decoder to get back your username and password.
- This is called a Man-In-The-Middle (MiTM) attack.
Token-Based Authentication
- In this scheme, the user will type in their username and password (credentials), and the server will generate a token based on those credentials.
- The server then sends this token out to the user and it also stores a copy of it in the database.
- Now the user has exchanged the credentials for a server-generated token.
- Now the user doesn’t need to send in login credentials with every request. Instead, they just send in the encoded token.
- There are ways to encode date and time into this token so someone intercepting the token cannot re-use it after a certain time.
- The user will need to pass this token through either the header, body, or as a query parameter when it calls on an endpoint to access resources.
- The token can be set to expire after a certain amount of time so users will need to log in again. Tokens can also be revoked from the server-side if there has been any compromise.
- The most popular format for tokens is Jason Web Tokens (JWT).
- The fields of the token are key/value pairs. The keys are called claims.
- JWT Tokens are negotiated based on the OpenID Connect protocol (OIDC).
API Key and Client Secret
- The client that needs access to the resources needs to register itself with the API.
- The API generates a Key and a Secret for each registered client.
- These are then stored with the server, and a copy of these are sent to the client. The client will need to pass these in when they try to connect.
- Problem
- This is hard to scale.
- key management – get complicated
- That’s why some organizations prefer to hire a 3rd party service to do this.
- If you want to do it yourself instead of hiring a 3rd party service, you’ll want to automate the key generation and exchange so you can scale.
- The need for this automation is one of the main reasons an authorization framework like OAuth was developed.
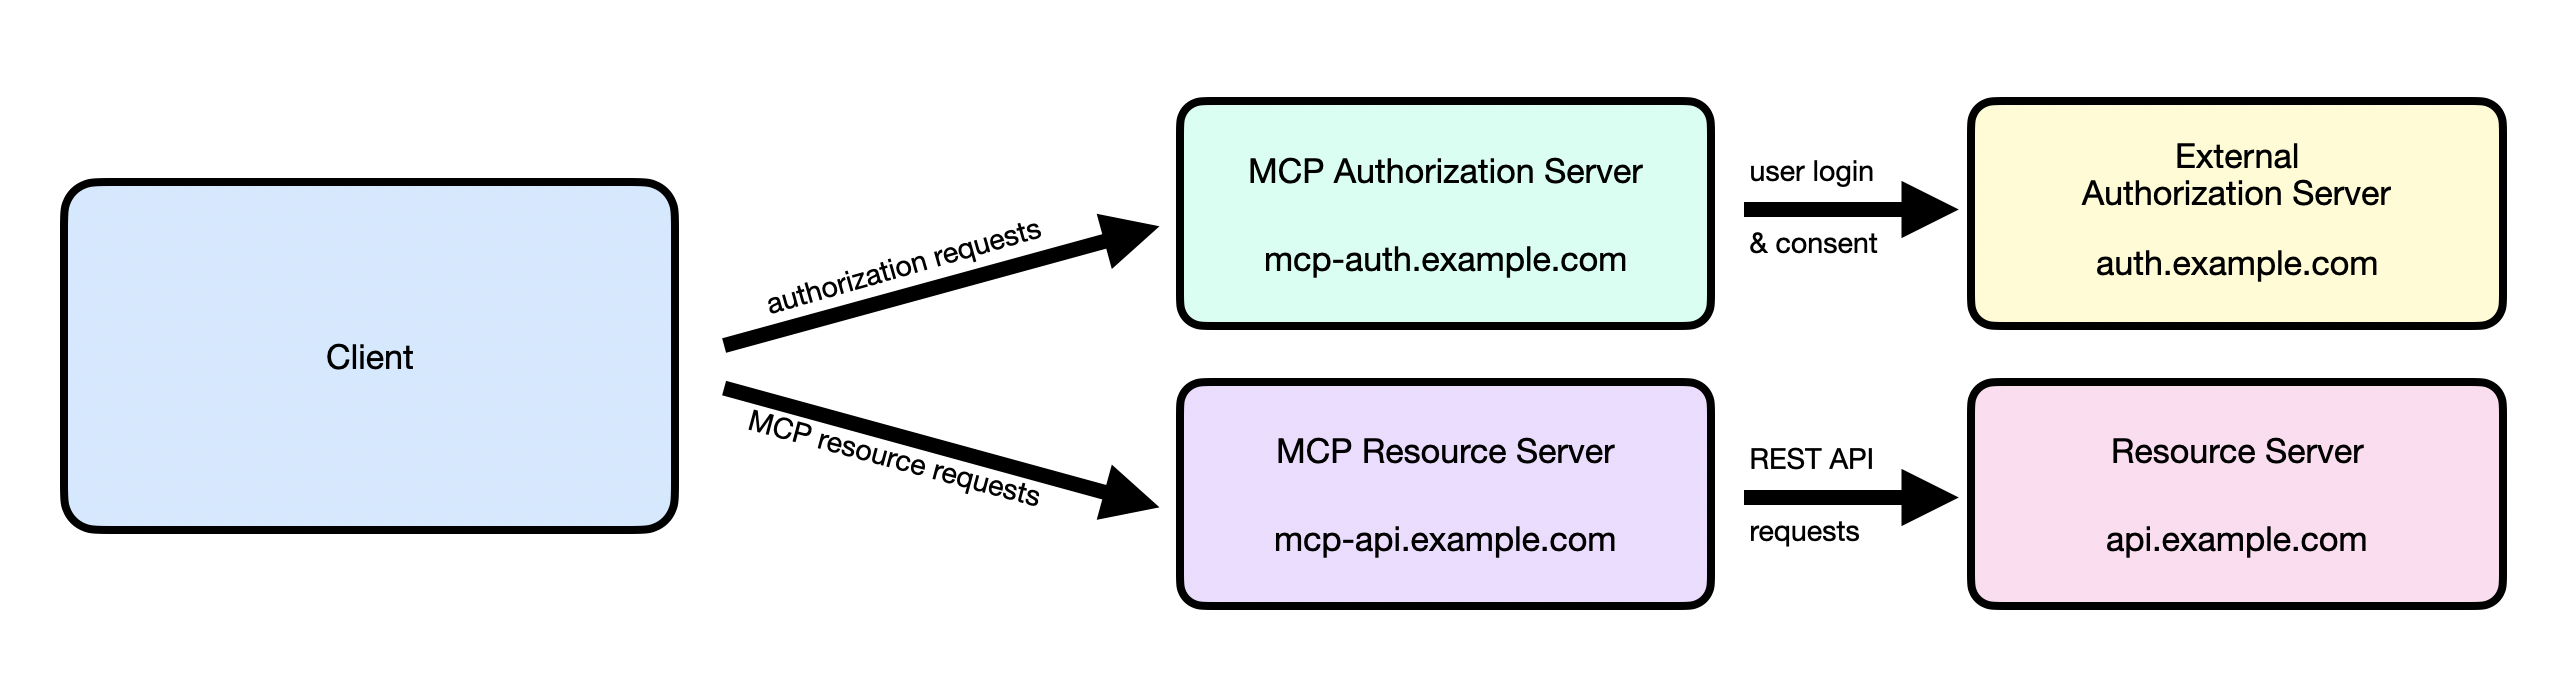
OAuth 2.0 (Open Authorization)
- OAuth automates the key generation and exchange.
- When an app needs your permission/authorization to access data on your behalf it’ll ask you to log in to the API provider.
- OAuth flow
- You go to the bank, show your ID
- authenticate yourself
- Tell them you want Joe to have access to your account
- Authorize Joe
- Give the bank Joe’s email address so the bank can send Joe an access token
- API Provider calls a website redirect URI with the access token in the response body
- Joe brings the access token to the bank along with his ID
- Client authenticates themselves and presents access token
- The bank grants Joe access to your account
- API provider grants client access to your resources
- You go to the bank, show your ID
Reference
All articles on this blog are licensed under CC BY-NC-SA 4.0 unless otherwise stated.
Related Articles

2022-03-26
Infrastructure - Authentication - Basic + JWT
HTTP Authentication Some common authentication schemes include: Basic Bearer The server responds to a client with a 401 (Unauthorized) response status and provides information on how to authorize with a WWW-Authenticate response header containing at least one challenge. A client that wants to authenticate itself with the server can then do so by including an Authorization request header with the credentials. Usually a client will present a password prompt to the user and will then issue the request inc...

2022-03-26
Infrastructure - Authentication - LDAP
What is LDAP 目录服务 目录 ≈ 树状结构的数据库 目录服务 ≈ 以树状结构的目录数据库为基础,外加各种访问协议的信息查询服务 目录数据库 vs 关系型数据库:读取性能极高,写入性能非常差(不支持事务),不适合频繁修改数据 用途:具有层次性且不需要频繁修改的数据,例如企业员工信息、企业设备信息等 LDAP DAP = Directory Access Protocol X.500 是一套目录服务的标准(协议族) 通过 X.500 可以将局部的目录服务连接起来,构建基于 Internet 的分布在全球的目录服务系统 DAP 是 X.500 的核心组成之一,但非常复杂,因此诞生了 LDAP LDAP 是基于 X.500 的 DAP 发展而来,目前是第 3 版 LDAP 特点 基于 TCP/IP 以树状结构存储数据 读取速度快,写入速度慢 服务端用于存放数据,客户端用于操作数据 跨平台,维护简单 支持 SSL/TLS 加密 协议是开放的 样例

2022-10-04
JavaScript - Object
OOP实现方式 在不同的编程语言中,设计者利用各种不同的语言特性来抽象描述对象 最为成功的流派:使用类来描述对象,典型代表为 Java、C++ JavaScript 的实现方式:原型(更冷门!) Like Java JavaScript 诞生之初模仿 Java,在原型运行时引入了 new,this 等语言特性 在 ES6 之前,产生了很多『框架』:试图在原型体系的基础上,把 JavaScript 变得更像是基于类的编程 这些『框架』最终成为了 JavaScript 的古怪方言 任何语言在运行时,类的概念都会被弱化 对象模型基本特征 对象有唯一标识性:完全相同的两个对象,也并非同一个对象 对象有状态:同一对象可能处于不同的状态之下 对象有行为:对象的状态,可能因为它的行为产生变迁 对象的唯一标识,一般是通过内存地址来体现的 123let a = {name: 'A'}let b = {name: 'A'}console.log(a === b) // false 状态和行为,不同语言会使用不同的术...
2023-02-07
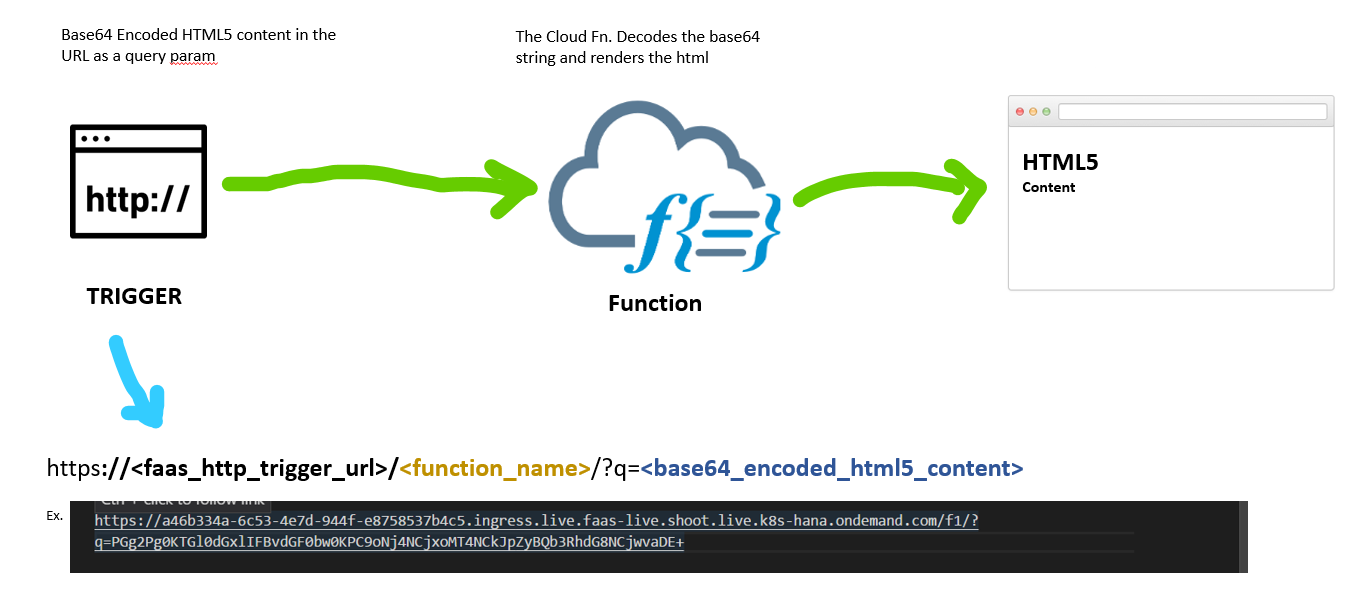
FaaS - Trigger
事件 事件为系统运行期间发生的动作或者发生的事情,而函数计算,提供了一种事件驱动的计算模型 CloudEvents 期望通过一种通用的格式描述事件数据的规范,以提供跨服务、平台和系统的互操作性 国内云厂商的事件规范程度:在其中一家云产品上开发了函数,一般都需要进行简单的适配才能迁移 CNCF Serverless 工作组针对函数和工作流均定义了相关的格式规范和原语 单函数的事件触发 多个简单函数通过异步调用的方式形成事件触发 复杂场景下通过 WorkFlow 来进行编排的事件交互 触发器概述 由事件驱动连接上下游服务的关系组合称为触发器 函数计算由云函数和触发器组成 触发器描述了一组关系和规则,包括核心要素:事件源、目标函数、触发条件 事件源:事件的生产者 目标函数:事件的处理者 触发条件:当触发条件满足时,就会通知函数计算引擎,调度对应的目标函数执行 触发器的元数据可以由服务方持久存储,也可以由函数托管平台和服务方共同持有 类型集成原则 区别:事件源和事件的规则存储在哪里,以及从哪里触发 单向集成触发器 双向集成触发器 代理集成触发器 设计触发器的主要考虑:事件源和函数计算的...
2022-10-06
JavaScript - Asynchronous
Asynchronous 异步编程适用于 IO 密集型应用 异步编程的传统实现方式:Callback 1234567console.log("main start");setTimeout(() => console.log("sync start"), 1000);console.log("main end");// main start// main end// sync start 依次执行多个异步操作:Callback Hell 1234567891011121314151617setTimeout(() => { console.log("Action 1"); setTimeout(() => { console.log("Action 2"); setTimeout(() => { console.log("Action 3"); ...

2022-05-14
Infrastructure - Security - OAuth 2.0 - Integration