Feature
Apache APISIX 基于 Radixtree Route 和 etcd 提供路由极速匹配与配置快速同步的能力
Apache APISIX 提供了自定义插件的能力
可以在 Balancer 阶段使用自定义负载均衡算法,并使用自定义路由算法对路由进行精细化控制
Apache APISIX 提供了配置热更新、插件热加载能力,在不重新启动实例的情况下可快速更新配置
Quick Start 路由
Apache APISIX 使用 routes 来提供灵活的网关管理功能,在一个请求中,routes 包含了访问路径和上游目标等信息
Route
Route 是访问上游目标的路径
过程
通过预定的规则来匹配客户端请求
然后加载和执行相应的插件
最后将请求转发至特定的 Upstream
一个最简单的 Route 仅由匹配路径和 Upstream 地址两个信息组成
Upstream
Upstream 是一组具备相同功能的节点集合,它是对虚拟主机的抽象
Upstream 可以通过预先配置的规则对多个服务节点进行负载均衡
Examples
创建路由 = Uri + Upstream
1
2
3
4
5
6
7
8
9
10
11
$ curl -i "http://127.0.0.1:9180/apisix/admin/routes" -X PUT -d ' { "id" : "getting-started-ip" , "uri" : "/ip" , "upstream" : { "type" : "roundrobin" , "nodes" : { "httpbin.org:80" : 1 } } } '
请求路由
1
2
3
4
$ curl "http://127.0.0.1:9080/ip" { "origin" : "172.18.0.1, 129.227.149.219" }
负载均衡
负载均衡管理客户端和服务端之间的流量
负载均衡决定由哪个服务来处理特定的请求,从而提高性能、可扩展性和可靠性
Apache APISIX 支持加权负载均衡算法,传入的流量按照预定顺序轮流分配给一组服务器的其中一个
Examples
创建路由,并启用负载均衡
1
2
3
4
5
6
7
8
9
10
11
12
13
14
$ curl -i "http://127.0.0.1:9180/apisix/admin/routes" -X PUT -d ' { "id" : "getting-started-headers" , "uri" : "/headers" , "upstream" : { "type" : "roundrobin" , "nodes" : { "httpbin.org:443" : 1 , "mock.api7.ai:443" : 1 } , "pass_host" : "node" , # 将传递请求头给上游 "scheme" : "https" # 向上游发送请求时将启用 TLS } } '
验证负载均衡的效果
1
2
$ hc=$(seq 100 | xargs -I { } curl "http://127.0.0.1:9080/headers" -sL | grep "httpbin" | wc -l); echo httpbin.org: $hc, mock.api7.ai: $((100 - $hc)) httpbin.org: 48 , mock.api7.ai: 52
密钥验证 Consumer
Consumer 为使用 API 的应用或者开发人员
在 APISIX 中,Consumer 需要一个全局唯一的名称,并选择一个身份验证插件
设计思路
管理员为路由添加一个 API 密钥
Consumer 在发送请求时,在 Query 或者 Header 中添加 API 密钥
Examples
创建名为 tom 的 Consumer,并启用密钥验证插件,密钥设置为 secret-key
所有携带密钥 secret-key 的请求都会被识别为 Consumer tom
1
2
3
4
5
6
7
8
9
$ curl -i "http://127.0.0.1:9180/apisix/admin/consumers" -X PUT -d ' { "username" : "tom" , "plugins" : { "key-auth" : { "key" : "secret-key" } } } '
使用 PATCH 方法,为现有路由新增插件
1
2
3
4
5
6
$ curl -i "http://127.0.0.1:9180/apisix/admin/routes/getting-started-ip" -X PATCH -d ' { "plugins" : { "key-auth" : { } } } '
验证插件启用效果
1
2
3
4
5
6
7
8
$ curl -i "http://127.0.0.1:9080/ip" HTTP/1.1 401 Unauthorized Content-Type: text/plain; charset=utf-8 Transfer-Encoding: chunked Connection: keep-alive Server: APISIX/3.9 .0 { "message" : "Missing API key found in request" }
1
2
3
4
5
6
7
8
$ curl -i "http://127.0.0.1:9080/ip" -H 'apikey: wrong-key' HTTP/1.1 401 Unauthorized Content-Type: text/plain; charset=utf-8 Transfer-Encoding: chunked Connection: keep-alive Server: APISIX/3.9 .0 { "message" : "Invalid API key in request" }
1
2
3
4
5
6
7
8
9
10
11
12
$ curl -i "http://127.0.0.1:9080/ip" -H 'apikey: secret-key' HTTP/1.1 200 OK Content-Type: application/json Content-Length: 46 Connection: keep-alive Access-Control-Allow-Origin: * Access-Control-Allow-Credentials: true Server: APISIX/3.9 .0 { "origin" : "172.18.0.1, 129.227.149.219" }
禁用插件
1
2
3
4
5
6
7
8
9
10
$ curl "http://127.0.0.1:9180/apisix/admin/routes/getting-started-ip" -X PATCH -d ' { "plugins" : { "key-auth" : { "_meta" : { "disable" : true } } } } '
1
2
3
4
5
6
7
8
9
10
11
12
$ curl -i "http://127.0.0.1:9080/ip" HTTP/1.1 200 OK Content-Type: application/json Content-Length: 46 Connection: keep-alive Access-Control-Allow-Origin: * Access-Control-Allow-Credentials: true Server: APISIX/3.9 .0 { "origin" : "172.18.0.1, 129.227.149.219" }
限速
APISIX 提供限速功能,通过限制在规定时间内发送到上游服务的请求数量来保护 APIs 和微服务
请求的计数在内存中完成,具有低延迟和高性能的特点
APISIX 也支持使用 Redis 集群进行限速配置,即通过 Redis 来进行计数
Examples
使用 PATCH 方法,为现有路由新增限速插件
1
2
3
4
5
6
7
8
9
10
$ curl -i "http://127.0.0.1:9180/apisix/admin/routes/getting-started-ip" -X PATCH -d ' { "plugins" : { "limit-count" : { "count" : 2 , "time_window" : 10 , "rejected_code" : 503 } } } '
验证限速效果
1
2
$ count=$(seq 100 | xargs -I { } curl "http://127.0.0.1:9080/ip" -I -sL | grep "503" | wc -l); echo \"200\": $((100 - $count)), \"503\": $count " 200 ": 2, " 503 ": 98
Installation
Mac -> VM -> Minikube -> Kubernetes -> APISIX
1
2
3
4
5
6
$ minikube profile list |----------|-----------|---------|--------------|------|---------|---------|-------|--------| | Profile | VM Driver | Runtime | IP | Port | Version | Status | Nodes | Active | |----------|-----------|---------|--------------|------|---------|---------|-------|--------| | minikube | docker | docker | 192.168.49.2 | 8443 | v1.28.3 | Running | 1 | * | |----------|-----------|---------|--------------|------|---------|---------|-------|--------|
1
2
3
$ helm repo add apisix https://charts.apiseven.com $ helm repo update $ helm install apisix apisix/apisix --create-namespace --namespace apisix
端口转发:apisix-gateway / apisix-admin
1
2
3
$ k port-forward -n apisix svc/apisix-gateway 9080:80 --address 0.0.0.0 $ k port-forward -n apisix svc/apisix-admin 9180:9180 --address 0.0.0.0
获取 Admin API key
1
2
3
4
5
6
7
$ k get cm -n apisix apisix -oyaml | grep -A5 admin_key admin_key: # admin: can everything for configuration data - name: "admin" key: edd1c9f034335f136f87ad84b625c8f1 role: admin # viewer: only can view configuration data
在 Mac 上验证
1
2
3
4
5
6
7
8
9
10
11
12
13
14
15
16
17
18
19
$ curl -s "http://apisix:9080" --head | grep Server Server: APISIX/3.8.0 $ curl -s "http://apisix:9180" --head | grep Server Server: openresty $ curl -si "http://apisix:9180/apisix/admin/routes?api_key=edd1c9f034335f136f87ad84b625c8f1" HTTP/1.1 200 OK Content-Type: application/json Transfer-Encoding: chunked Connection: keep-alive Server: APISIX/3.8.0 Access-Control-Allow-Origin: * Access-Control-Allow-Credentials: true Access-Control-Expose-Headers: * Access-Control-Max-Age: 3600 X-API-VERSION: v3 {"total":0,"list":[]}
Architecture
APISIX 构建于 NGINX + ngx_lua 的技术基础之上,充分利用了 LuaJIT 所提供的强大性能
组成部分
APISIX Core:Lua 插件、多语言插件运行时、WASM 插件运行时(实验性)
提供了路由匹配、负载均衡、服务发现、API 管理等重要功能,以及配置管理等基础性模块
功能丰富的各种内置插件:可观测性、安全、流量控制
插件加载流程
插件内部结构
API 概念 Upstream
Upstream 是对虚拟主机的抽象,即应用层服务或节点的抽象
Upstream 的作用是按照配置规则对服务节点进行负载均衡
配置方式
Upstream 的地址信息可以直接配置到 Route 或 Service 上
当多个 Route 或者 Service 引用同一个 Upstream 时
可以创建 Upstream 对象,在 Route 或者 Service 中使用 Upstream ID 的方式引用 Upstream 对象
Route
Route 是 APISIX 中最基础和最核心的资源对象
APISIX 可以通过 Route 定义规则
匹配客户端请求根据匹配结果加载并执行相应的插件
最后将请求转发到指定的上游服务
Route 组成部分:匹配规则、插件配置、上游信息
Service
Service 是某类 API 的抽象(或者是一组 Route 的抽象)
Service 通常与上游服务抽象是一一对应的
Route : Service = N : 1
Plugin
Plugin 是扩展 APISIX 应用层能力的关键机制
Plugin 主要是在 HTTP 请求或者响应生命周期期间执行的、针对请求的个性化策略
Plugin 可以与 Route、Service、Consumer 绑定
如果 Route、Service、Plugin Config、Consumer 都绑定了相同的插件,则只有一份插件配置会生效
插件配置的优先级(越具体,优先级越高):Consumer > Route > Plugin Config > Service
插件执行过程
rewrite、access、before_proxy、header_filter、body_filter、log
发布
创建 Upstream
1
2
3
4
5
6
7
8
$ curl "http://apisix:9180/apisix/admin/upstreams/1" \ -H "X-API-KEY: edd1c9f034335f136f87ad84b625c8f1" -X PUT -d ' { "type" : "roundrobin" , "nodes" : { "httpbin.org:80" : 1 } } '
创建 Route(可以顺便指定 Upstream 的详细配置)
1
2
3
4
5
6
7
8
$ curl "http://apisix:9180/apisix/admin/routes/1" \ -H "X-API-KEY: edd1c9f034335f136f87ad84b625c8f1" -X PUT -d ' { "methods" : [ "GET" ] , "host" : "example.com" , "uri" : "/anything/*" , "upstream_id" : "1" } '
测试 Route
1
2
3
4
5
6
7
8
9
10
11
12
13
14
15
16
17
18
19
20
21
22
23
24
25
26
27
28
29
$ curl -i -X GET "http://apisix:9080/anything/get?foo1=bar1&foo2=bar2" -H "Host: example.com" HTTP/1.1 200 OK Content-Type: application/json Content-Length: 461 Connection: keep-alive Access-Control-Allow-Origin: * Access-Control-Allow-Credentials: true Server: APISIX/3.8 .0 { "args" : { "foo1" : "bar1" , "foo2" : "bar2" } , "data" : "" , "files" : { } , "form" : { } , "headers" : { "Accept" : "*/*" , "Host" : "example.com" , "User-Agent" : "curl/8.4.0" , "X-Amzn-Trace-Id" : "Root=1-660d232a-620c25703549fffa42f97497" , "X-Forwarded-Host" : "example.com" } , "json" : null , "method" : "GET" , "origin" : "127.0.0.1, 129.227.149.219" , "url" : "http://example.com/anything/get?foo1=bar1&foo2=bar2" }
保护
限流限速
Plugin
Desc
limit-conn
限制客户端对服务的并发请求数
limit-req
使用漏桶算法限制对服务的请求速率
limit-count
在指定的时间范围内,限制每个客户端总请求个数 - 固定窗口
创建 Route,配置 limit-count 插件
1
2
3
4
5
6
7
8
9
10
11
12
13
14
15
$ curl -i http: -H 'X-API-KEY: edd1c9f034335f136f87ad84b625c8f1' -X PUT -d ' { "uri" : "/index.html" , "plugins" : { "limit-count" : { "count" : 2 , "time_window" : 60 , "rejected_code" : 503 , "key_type" : "var" , "key" : "remote_addr" } } , "upstream_id" : "1" } '
测试 Plugin
1
2
3
4
5
6
7
8
9
10
11
12
13
14
15
16
17
18
19
20
21
22
23
24
25
26
27
28
29
30
31
32
33
$ curl -sI http://apisix:9080/index.html HTTP/1.1 404 NOT FOUND Content-Type: text/html; charset=utf-8 Content-Length: 233 Connection: keep-alive X-RateLimit-Limit: 2 X-RateLimit-Remaining: 1 X-RateLimit-Reset: 60 Access-Control-Allow-Origin: * Access-Control-Allow-Credentials: true Server: APISIX/3.8.0 $ curl -sI http://apisix:9080/index.html HTTP/1.1 404 NOT FOUND Content-Type: text/html; charset=utf-8 Content-Length: 233 Connection: keep-alive X-RateLimit-Limit: 2 X-RateLimit-Remaining: 0 X-RateLimit-Reset: 55 Access-Control-Allow-Origin: * Access-Control-Allow-Credentials: true Server: APISIX/3.8.0 $ curl -sI http://apisix:9080/index.html HTTP/1.1 503 Service Temporarily Unavailable Content-Type: text/html; charset=utf-8 Content-Length: 269 Connection: keep-alive X-RateLimit-Limit: 2 X-RateLimit-Remaining: 0 X-RateLimit-Reset: 53 Server: APISIX/3.8.0
流量控制插件
Plugin
Desc
proxy-cache
缓存后端响应数据,支持基于磁盘和内存的缓存
request-validation
提前验证向上游服务转发的请求
proxy-mirror
镜像客户端请求,将线上真实流量拷贝到镜像服务中
api-breaker
API 熔断
traffic-split
流量百分比,用于实现蓝绿发布、灰度发布
request-id
为每个请求代理添加 unique_id,用于追踪 API 请求
proxy-control
动态控制 Nginx 代理的相关行为
client-control
通过设置客户端请求体大小的上限来动态控制 Nginx 处理客户端的请求
监控
可观测性分为三个关键部分:Logging、Metrics、Tracing
Logging
在 APISIX 中,日志可以分为访问日志和错误日志
1
2
3
4
5
6
7
8
9
$ k exec -it -n apisix apisix-688757658f-nw4mj -c apisix -- pwd /usr/local/apisix $ k exec -it -n apisix apisix-688757658f-nw4mj -c apisix -- ls -l logs total 4 lrwxrwxrwx 1 apisix apisix 11 Feb 22 14:25 access.log -> /dev/stdout lrwxrwxrwx 1 apisix apisix 11 Feb 22 14:25 error.log -> /dev/stderr -rw-r--r-- 1 apisix apisix 2 Apr 3 07:47 nginx.pid srw-rw-rw- 1 apisix apisix 0 Apr 3 07:47 worker_events.sock
可以通过 APISIX 的日志插件,将 APISIX 的日志发送到指定的日志服务中,将日志数据发送到 mockbin.io 服务中
1
2
3
4
5
6
7
8
9
10
11
$ curl http: -H 'X-API-KEY: edd1c9f034335f136f87ad84b625c8f1' -X PUT -d ' { "plugins" : { "http-logger" : { "uri" : "https://96702d792b6045c49325bec8c3b351c6.api.mockbin.io/" } } , "upstream_id" : "1" , "uri" : "/get" } '
请求 Route
1
2
3
4
5
6
7
8
9
10
11
12
13
14
15
16
17
18
19
20
21
22
$ curl -i http: HTTP/1.1 200 OK Content-Type: application/json Content-Length: 291 Connection: keep-alive Date: Thu, 04 Apr 2024 05 : 53 : 13 GMT Access-Control-Allow-Origin: * Access-Control-Allow-Credentials: true Server: APISIX/3.8 .0 { "args" : { } , "headers" : { "Accept" : "*/*" , "Host" : "apisix" , "User-Agent" : "curl/8.4.0" , "X-Amzn-Trace-Id" : "Root=1-660e4049-4b39e7d01a6ccd7515bac485" , "X-Forwarded-Host" : "apisix" } , "origin" : "127.0.0.1, 129.227.149.219" , "url" : "http://apisix/get" }
Metrics
Metrics 是一段时间内测量的数值,默认情况下为结构化数据
APISIX 提供 Prometheus 插件来获取 API Metrics,并在 Prometheus 中暴露它们
通过使用 APISIX 提供的 Grafana Dashboard 元数据,并从 Prometheus 中获取 Metrics,可以更加方便地监控 API
APISIX 启用 Prometheus - apisix.prometheus.enabled=true
1 $ h upgrade apisix apisix/apisix --create-namespace --namespace apisix --set apisix.prometheus.enabled=true
Route 启用 Prometheus 插件
1
2
3
4
5
6
7
8
9
$ curl http: -H 'X-API-KEY: edd1c9f034335f136f87ad84b625c8f1' -X PUT -d ' { "uri" : "/get" , "plugins" : { "prometheus" : { } } , "upstream_id" : "1" } '
获取 Prometheus Metrics
1
2
3
4
5
6
curl -si http: # HELP apisix_http_status HTTP status codes per service in APISIX # TYPE apisix_http_status counter apisix_http_status{ code="200" , route="1" , matched_uri="/get" , matched_host="" , service="" , consumer="" , node="184.73.70.187" } 1 apisix_http_status{ code="200" , route="1" , matched_uri="/get" , matched_host="" , service="" , consumer="" , node="35.168.90.70" } 1 apisix_http_status{ code="200" , route="1" , matched_uri="/get" , matched_host="" , service="" , consumer="" , node="54.147.29.229" } 1
Tracing
Tracing 将一次请求还原成调用链路,并将该请求的调用情况使用拓扑的方式呈现
APISIX Zipkin 插件支持根据 Zipkin API 规范收集链路信息并报告给 Zipkin Collector
启用 Zipkin 插件
1
2
3
4
5
6
7
8
9
10
11
12
13
14
15
$ curl http: -H 'X-API-KEY: edd1c9f034335f136f87ad84b625c8f1' -X PUT -d ' { "methods" : [ "GET" ] , "uri" : "/get" , "plugins" : { "zipkin" : { "endpoint" : "http://127.0.0.1:9411/api/v2/spans" , "sample_ratio" : 1 } } , "upstream_id" : "1" } '
健康检查
健康检查可以在上游节点发生故障或者迁移时,将请求代理到健康的节点上,最大程度避免服务不可用的问题
主动健康检查
APISIX 通过预设的探针类型(HTTP、HTTPS、TCP),主动探测上游节点的存活性
当发往健康节点 A 的 N 个连续探针都失败,则该节点将被标记为不健康
不健康的节点将会被 APISIX 的负载均衡器忽略,无法收到请求
如果某个不健康的节点,连续 M 个探针都成功,则该节点将被重新标记为健康,进而可以被代理
被动健康检查
通过判断从 APISIX 转发到上游节点的请求响应状态,来判断对应的上游节点是否健康
如果发往健康节点 A 的 N 个连续请求都被判定为失败,则该节点将被标记为不健康
无需发起额外的探针,但也无法提前感知节点状态,可能会存在一定量的失败请求
由于不健康的节点无法收到请求,因此必须配合主动健康检查,才有可能重新标记为健康
只有 Upstream 被请求时才会开始健康检查
如果 Upstream 被配置但没有被请求,不会触发启动健康检查
如果没有健康的节点,那么请求会继续发送到 Upstream
如果 Upstream 中只有一个节点时,不会触发启动健康检查
Examples
启用健康检查
1
2
3
4
5
6
7
8
9
10
11
12
13
14
15
16
17
18
19
20
21
22
23
24
25
26
27
28
29
30
31
32
33
34
35
36
37
38
39
40
41
42
43
44
45
46
47
$ curl http: { "uri" : "/index.html" , "plugins" : { "limit-count" : { "count" : 2 , "time_window" : 60 , "rejected_code" : 503 , "key" : "remote_addr" } } , "upstream" : { "nodes" : { "127.0.0.1:1980" : 1 , "127.0.0.1:1970" : 1 } , "type" : "roundrobin" , "retries" : 2 , "checks" : { "active" : { "timeout" : 5 , "http_path" : "/status" , "host" : "foo.com" , "healthy" : { "interval" : 2 , "successes" : 1 } , "unhealthy" : { "interval" : 1 , "http_failures" : 2 } , "req_headers" : [ "User-Agent: curl/7.29.0" ] } , "passive" : { "healthy" : { "http_statuses" : [ 200 , 201 ] , "successes" : 3 } , "unhealthy" : { "http_statuses" : [ 500 ] , "http_failures" : 3 , "tcp_failures" : 3 } } } } } '
发起请求,触发主动健康检查(只配置但没有请求,是不会触发健康检查的)
1
2
3
4
5
6
7
8
9
10
11
$ curl -sI http://apisix:9080/index.html HTTP/1.1 502 Bad Gateway Date: Thu, 04 Apr 2024 07:04:40 GMT Content-Type: text/html; charset=utf-8 Content-Length: 229 Connection: keep-alive X-RateLimit-Limit: 2 X-RateLimit-Remaining: 1 X-RateLimit-Reset: 60 Server: APISIX/3.8.0 X-APISIX-Upstream-Status: 502, 502 :
健康检查信息 status
在 APISIX 中,节点有 4 个状态:healthy、unhealthy、mostly_unhealthy、mostly_healthy
mostly_healthy
当前节点状态是健康的,但在健康检查期间,节点健康检测并不是一直都是成功的
mostly_unhealthy
当前节点状态是不健康的,但在健康检查期间,节点健康检测并不是一直都是失败的
counter
节点的状态转换取决于:本次健康检查的结果 + counter
counter 的数据:success、tcp_failure、http_failure、timeout_failure
Examples
需要开启 Control API - /v1/healthcheck
1
2
3
4
5
6
7
8
9
10
11
12
13
14
15
16
17
18
19
20
21
22
23
24
25
26
27
28
29
30
31
32
33
$ curl -s http: [ { "type" : "http" , "name" : "/apisix/routes/1" , "nodes" : [ { "status" : "unhealthy" , "counter" : { "http_failure" : 0 , "success" : 0 , "timeout_failure" : 0 , "tcp_failure" : 2 } , "port" : 1970 , "ip" : "127.0.0.1" , "hostname" : "foo.com" } , { "status" : "unhealthy" , "counter" : { "http_failure" : 0 , "success" : 0 , "timeout_failure" : 0 , "tcp_failure" : 2 } , "port" : 1980 , "hostname" : "foo.com" , "ip" : "127.0.0.1" } ] } ]
状态转化图
所有节点在没有初始探测的情况下,都是以 healthy 状态启动
计数器仅在状态变更时重置和更新
当节点处于 healthy 状态并且后续检查都成功时,success 计数器不会更新,保持为 0
如果健康检查失败,counter.success 重置为 0
如果健康检查成功,counter.tcp_failure、counter.http_failure、counter.timeout_failure 重置为 0
Prometheus
Create a global rule to enable the prometheus plugin on all routes by adding "prometheus": {} in the plugins option.
APISIX gathers internal runtime metrics and exposes them through port 9091 and URI path /apisix/prometheus/metrics by default that Prometheus can scrape.
1
2
3
4
5
6
7
8
$ curl "http://apisix:9180/apisix/admin/global_rules" -H "X-API-KEY: edd1c9f034335f136f87ad84b625c8f1" -X PUT -d ' { "id" : "rule-for-metrics" , "plugins" : { "prometheus" : { } } } '
APISIX automatically exposes health check metrics data for your APIs if the health check parameter is enabled for upstream nodes.
Health check data is represented with metrics label apisix_upstream_status.1 represents healthy and 0 means the upstream node is unhealthy.
1
2
3
4
5
$ curl -si http: # HELP apisix_upstream_status Upstream status from health check # TYPE apisix_upstream_status gauge apisix_upstream_status{ name="/apisix/routes/1" , ip="127.0.0.1" , port="1970" } 0 apisix_upstream_status{ name="/apisix/routes/1" , ip="127.0.0.1" , port="1980" } 0
Consumer API Consumers
API consumers are the users of APIs .
An API Management solution should know who the consumer of the API is to configure different rules for different consumers.
Apache APISIX Consumers
In Apache APISIX, the Consumer object is the most common way for API consumers to access APIs published through its API Gateway.
Consumer concept is extremely useful when you have different consumers requesting the same API and you need to execute various Plugins and Upstream configurations based on the consumer.
By publishing APIs through Apache APISIX API Gateway, you can easily secure API access using consumer keys or sometimes it can be referred to as subscription keys.
Developers who need to consume the published APIs must include a valid subscription key in HTTP requests when calling those APIs.
Without a valid subscription key, the calls are rejected immediately by the API gateway and not forwarded to the back-end services.
Consumers can be associated with various scopes: per Plugin, all APIs, or an individual API.
Use cases
Enable different authentication methods for different consumers.
Restrict access to API resources for specific consumers.
Route requests to the corresponding backend service based on the consumer.
Define rate limiting on the number of data clients can consume.
Analyze data usage for an individual and a subset of consumers.
Cache
Caching is capable of storing and retrieving network requests and their corresponding responses.
Caching happens at different levels in a web application
Edge caching or CDN
Database caching
Server caching (API caching)
Browser caching
Reverse Proxy Caching is yet another caching mechanism that is usually implemented inside API Gateway.
It can reduce the number of calls made to your endpoint and also improve the latency of requests to your API by caching a response from the upstream.
If the API Gateway cache has a fresh copy of the requested resource, it uses that copy to satisfy the request directly instead of making a request to the endpoint.
If the cached data is not found, the request travels to the intended upstream services (backend services).
Apache APISIX API Gateway Proxy Caching
With the help of Apache APISIX, you can enable API caching with proxy-cache plugin to cache your API endpoint’s responses and enhance the performance.
It can be used together with other Plugins too and currently supports disk-based caching.
The data to be cached can be filtered with responseCodes , requestModes , or more complex methods using the noCache and cacheByPass attributes.
You can specify cache expiration time or a memory capacity in the plugin configuration as well.
Versioning
API versioning is the practice of managing changes to an API and ensuring that these changes are made without disrupting clients.
A good API versioning strategy clearly communicates the changes made and allows API consumers to decide when to upgrade to the latest version at their own pace.
Types
URI Path
Query parameters
Custom request Header
The primary goal of versioning is to provide users of an API with the most functionality possible while causing minimal inconvenience.
WebSocket Protocol
To establish a WebSocket connection, the client sends a WebSocket handshake request
Client
1
2
3
4
5
6
7
8
GET /chat HTTP/1.1 Host: server.example.com Upgrade: websocket Connection: Upgrade Sec-WebSocket-Key: x3JJHMbDL1EzLkh9GBhXDw== Sec-WebSocket-Protocol: chat, superchat Sec-WebSocket-Version: 13 Origin: http://example.com
Server
1
2
3
4
5
HTTP/1.1 101 Switching Protocols Upgrade: websocket Connection: Upgrade Sec-WebSocket-Accept: HSmrc0sMlYUkAGmm5OPpG2HaGWk= Sec-WebSocket-Protocol: chat
handshake workflow
Authentication
While establishing connections from the client to server in the handshake phase, APISIX first checks its authentication information before choosing to forward the request or deny it.
Examples
创建 Route - wss://ws.postman-echo.com/raw
1
2
3
4
5
6
7
8
9
10
11
12
13
14
15
16
17
18
$ curl --location --request PUT 'http: --header 'X-API-KEY: edd1c9f034335f136f87ad84b625c8f1' \ --header 'Content-Type: application/json' \ --data-raw '{ "uri" : "/*" , "methods" : [ "GET" ] , "enable_websocket" : true , "upstream" : { "type" : "roundrobin" , "nodes" : { "ws.postman-echo.com:443" : 1 } , "scheme" : "https" } , "plugins" : { "key-auth" : { } } } '
创建 Consumer
1
2
3
4
5
6
7
8
9
10
11
$ curl --location --request PUT 'http: --header 'X-API-KEY: edd1c9f034335f136f87ad84b625c8f1' \ --header 'Content-Type: application/json' \ --data-raw '{ "username" : "jack" , "plugins" : { "key-auth" : { "key" : "this_is_the_key" } } } '
测试 Route
Terminology API Gateway
API 网关是位于客户端与后端服务集之间的 API 管理工具
API 网关相当于反向代理,用于接受所有 API 的调用、整合处理这些调用所需的各种服务,并返回相应的结果
API 网关通常会处理跨 API 服务系统使用 的常见任务,并统一接入进行管理
通过 API 网关的统一拦截,可以实现对 API 接口的安全、日志等共性需求,如用户身份验证、速率限制和统计信息
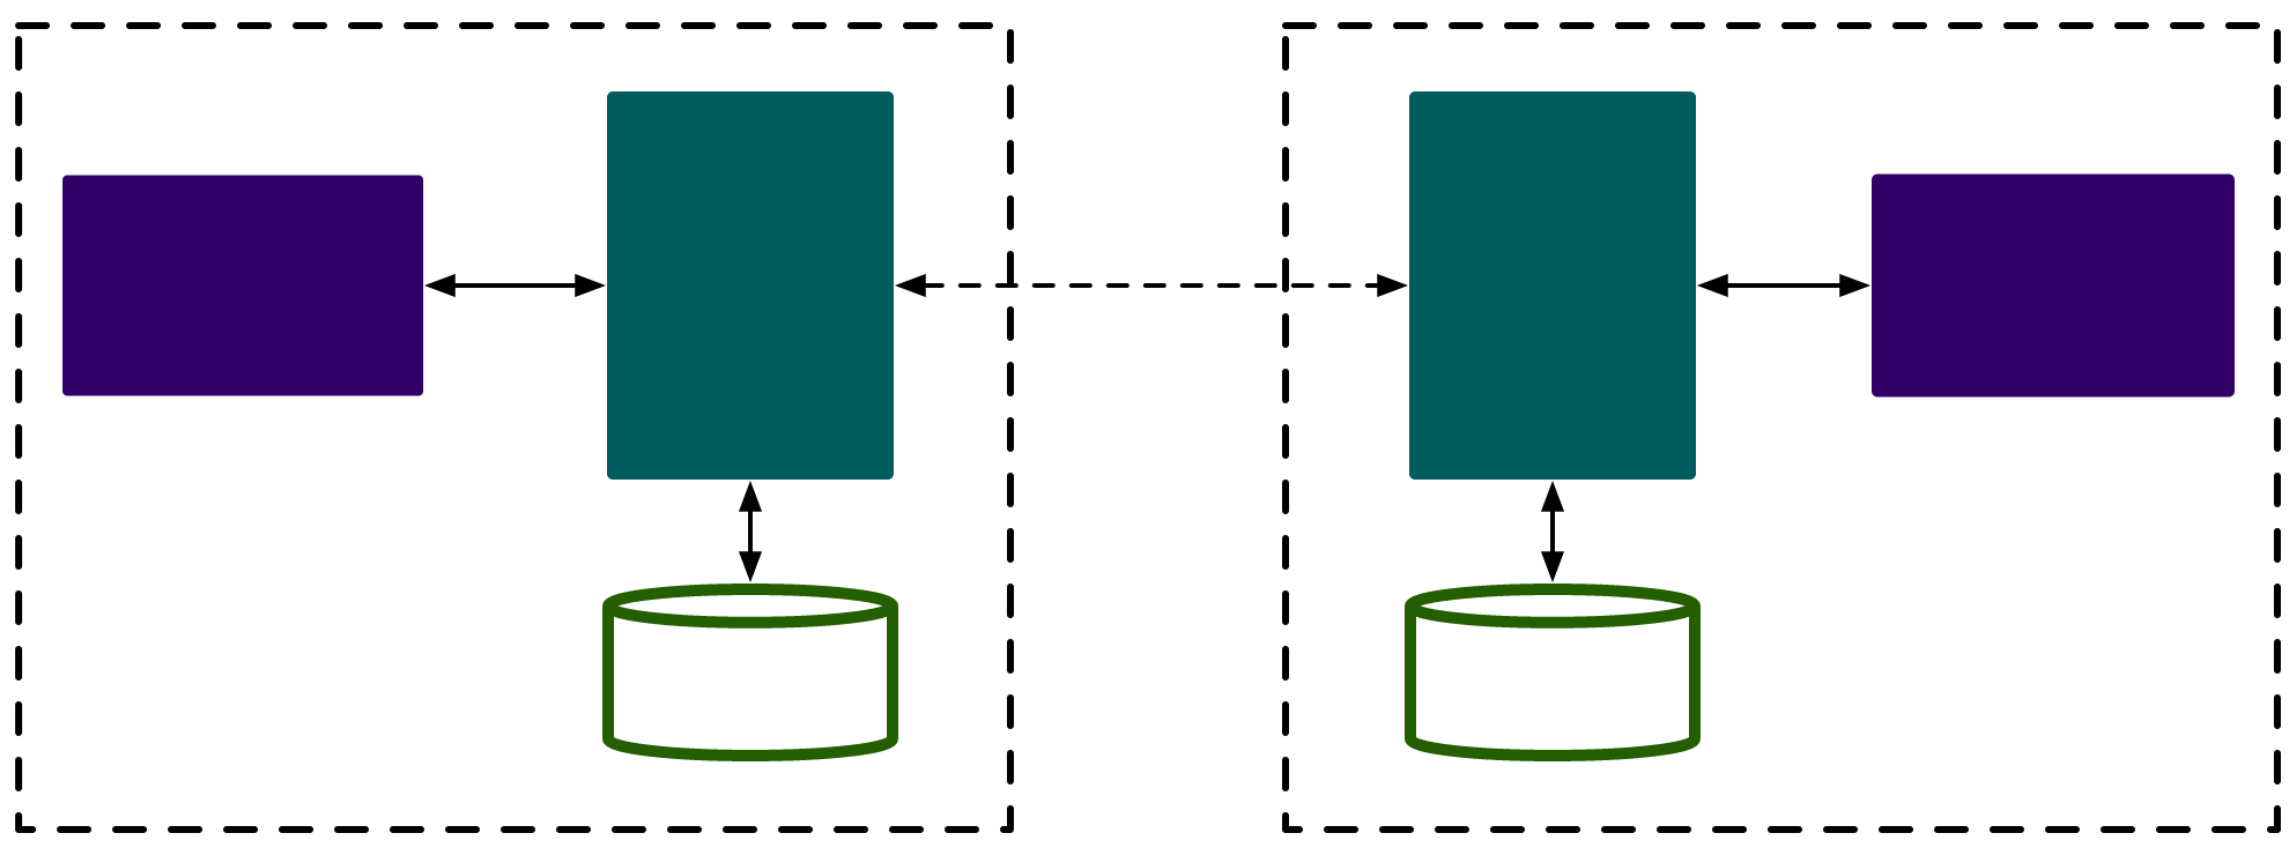
API Gateway vs API Microservices
它是所有 API 请求的唯一入口
可用于将请求转发到不同的后端,或根据请求头将请求转发到不同的服务
可用于执行身份验证、授权和限速
它可用于支持分析,例如监控、日志记录和跟踪
可以保护 API 免受 SQL 注入、DDOS 攻击和 XSS 等恶意攻击媒介的攻击
它可以降低 API 和微服务的复杂性
Consumer
Consumer 是某类服务的消费者,需要与用户认证配合才可以使用
当不同的消费者请求同一个 API 时,APISIX 会根据当前请求的用户信息,对应不同的 Plugin 或 Upstream 配置
如果 Route、Service、Consumer 和 Plugin Config 都绑定了相同的插件,只有 Consumer 的插件配置会生效
插件配置的优先级:Consumer > Route > Plugin Config > Service
识别消费者
身份认证
basic-auth、hmac-auth、jwt-auth、key-auth、ldap-auth、wolf-rbac
获取 Consumer Id - 消费者的唯一标识
获取 Consumer 上绑定的 Plugin 或者 Upstream 信息
Examples
创建 Consumer - key-auth + limit-count
1
2
3
4
5
6
7
8
9
10
11
12
13
14
15
16
$ curl http: -H 'X-API-KEY: edd1c9f034335f136f87ad84b625c8f1' -X PUT -d ' { "username" : "jack" , "plugins" : { "key-auth" : { "key" : "auth-one" } , "limit-count" : { "count" : 2 , "time_window" : 60 , "rejected_code" : 503 , "key" : "remote_addr" } } } '
创建 Route - key-auth
1
2
3
4
5
6
7
8
9
10
11
12
13
14
$ curl http: -H 'X-API-KEY: edd1c9f034335f136f87ad84b625c8f1' -X PUT -d ' { "plugins" : { "key-auth" : { } } , "upstream" : { "nodes" : { "127.0.0.1:1980" : 1 } , "type" : "roundrobin" } , "uri" : "/hello" } '
测试
1
2
3
4
5
6
7
8
9
10
11
12
13
14
15
16
17
18
19
20
21
22
23
24
25
26
27
28
29
30
31
32
33
$ curl http://apisix:9080/hello -H 'apikey: auth-one' -I HTTP/1.1 502 Bad Gateway Date: Thu, 04 Apr 2024 11:08:47 GMT Content-Type: text/html; charset=utf-8 Content-Length: 229 Connection: keep-alive X-RateLimit-Limit: 2 X-RateLimit-Remaining: 1 X-RateLimit-Reset: 60 Server: APISIX/3.8.0 X-APISIX-Upstream-Status: 502 $ HTTP/1.1 502 Bad Gateway Date: Thu, 04 Apr 2024 11:08:54 GMT Content-Type: text/html; charset=utf-8 Content-Length: 229 Connection: keep-alive X-RateLimit-Limit: 2 X-RateLimit-Remaining: 0 X-RateLimit-Reset: 53 Server: APISIX/3.8.0 X-APISIX-Upstream-Status: 502 $ curl http://apisix:9080/hello -H 'apikey: auth-one' -I HTTP/1.1 503 Service Temporarily Unavailable Date: Thu, 04 Apr 2024 11:08:56 GMT Content-Type: text/html; charset=utf-8 Content-Length: 269 Connection: keep-alive X-RateLimit-Limit: 2 X-RateLimit-Remaining: 0 X-RateLimit-Reset: 51 Server: APISIX/3.8.0
启用 consumer-restriction 插件,限制 Consumer 对 Route 的访问
1
2
3
4
5
6
7
8
9
10
11
12
13
14
15
16
17
18
19
$ curl http: -H 'X-API-KEY: edd1c9f034335f136f87ad84b625c8f1' -X PUT -d ' { "plugins" : { "key-auth" : { } , "consumer-restriction" : { "blacklist" : [ "jack" ] } } , "upstream" : { "nodes" : { "127.0.0.1:1980" : 1 } , "type" : "roundrobin" } , "uri" : "/hello" } '
1
2
3
4
5
6
$ curl http://apisix:9080/hello -H 'apikey: auth-one' -I HTTP/1.1 403 Forbidden Date: Thu, 04 Apr 2024 11:11:25 GMT Content-Type: text/plain; charset=utf-8 Connection: keep-alive Server: APISIX/3.8.0
Consumer Groups
在同一个 Consumer Group 中启用任意数量的插件,并在一个或者 Consumer 中引用该 Consumer Group
创建 Consumer Group
1
2
3
4
5
6
7
8
9
10
11
12
$ curl http: -H 'X-API-KEY: edd1c9f034335f136f87ad84b625c8f1' -X PUT -d ' { "plugins" : { "limit-count" : { "count" : 200 , "time_window" : 60 , "rejected_code" : 503 , "group" : "grp_company_a" } } } '
在 Consumer 中引用 Consumer Group(如果找不到,终止请求,返回 404)
1
2
3
4
5
6
7
8
9
10
11
$ curl http: -H 'X-API-KEY: edd1c9f034335f136f87ad84b625c8f1' -X PUT -d ' { "username" : "jack" , "plugins" : { "key-auth" : { "key" : "auth-one" } } , "group_id" : "company_a" } '
如果 Consumer 已经配置了插件,那么将与 Consumer Group 中的插件合并
当一份插件分别在 Consumer、Route、Plugin Config、Service 中时,只会有一份插件配置生效,Consumer 的优先级最高
如果 Consumer 和 Consumer Group 配置了相同的插件,则 Consumer 的插件配置优先级更高
Global Rules
Plugin 的配置可以直接绑定在 Route、Service、Consumer 上Global Rules 为全局插件配置,作用于所有请求的 Plugin
相对于 Route、Service、Plugin Config、Consumer 中的插件配置、Global Rules 中的插件总是优先执行
创建 Global Rules
1
2
3
4
5
6
7
8
9
10
11
12
13
14
$ curl http: -H 'Content-Type: application/json' \ -H 'X-API-KEY: edd1c9f034335f136f87ad84b625c8f1' \ -d '{ "plugins" : { "limit-count" : { "time_window" : 60 , "policy" : "local" , "count" : 2 , "key" : "remote_addr" , "rejected_code" : 503 } } } '
查看 Global Rules
1
2
3
4
5
6
7
8
9
10
11
12
13
14
15
16
17
18
19
20
21
22
23
24
25
26
27
28
29
30
31
32
33
34
35
36
37
38
39
40
41
42
43
$ curl -s http: { "total" : 2 , "list" : [ { "value" : { "plugins" : { "limit-count" : { "time_window" : 60 , "key_type" : "var" , "allow_degradation" : false , "rejected_code" : 503 , "show_limit_quota_header" : true , "policy" : "local" , "count" : 2 , "key" : "remote_addr" } } , "update_time" : 1712229810 , "create_time" : 1712229810 , "id" : "1" } , "modifiedIndex" : 65 , "createdIndex" : 65 , "key" : "/apisix/global_rules/1" } , { "value" : { "plugins" : { "prometheus" : { "prefer_name" : false } } , "update_time" : 1712220359 , "create_time" : 1712220359 , "id" : "rule-for-metrics" } , "modifiedIndex" : 57 , "createdIndex" : 57 , "key" : "/apisix/global_rules/rule-for-metrics" } ] }
Plugin
APISIX 插件可以扩展 APISIX 的功能,以满足组织或用户特定的流量管理、可观测性、安全、请求/响应转换、无服务器计算等需求
APISIX 插件可以全局启用,也可以局部绑定到其它对象(Route、Service、Consumer、Plugin Config)
安装的插件首先会被初始化。然后会检查插件的配置,以确保插件配置遵循定义的 JSON Schema
当一个请求通过 APISIX 时,插件的相应方法会在以下一个或多个阶段中执行
插件执行顺序
Global Rules Plugin
rewrite 阶段的插件access 阶段的插件
绑定到其它对象的插件
rewrite 阶段的插件access 阶段的插件
在每个阶段内,可以在插件的 _meta.priority 字段中可选地定义一个新的优先级数,该优先级数优先于默认插件优先级
若要将插件实例的优先级重置为默认值,只需从插件配置中删除_meta.priority字段即可
插件合并优先顺序
当同一个插件在全局规则中和局部规则(例如路由)中同时配置时,两个插件将顺序执行
如果相同的插件在多个对象上本地配置,如 Route、Service、Consumer、Plugin Config,每个非全局插件只会执行一次
在执行期间,针对特定的优先顺序,这些对象中配置的插件会被合并
Consumer > Consumer Group > Route > Plugin Config > Service如果相同的插件在不同的对象中具有不同的配置,则合并期间具有最高优先顺序的插件配置将被使用
自定义插件优先级只会影响插件实例绑定的主体,不会影响该插件的所有实例自定义插件优先级不适用于 Consumer 上配置的插件的 rewrite 阶段
Route 上配置的插件的 rewrite 阶段将会优先运行,然后才会运行 Consumer 上除 auth 类插件之外的其他插件的 rewrite 阶段
动态控制插件执行状态
默认情况下,在 Route 中指定的 Plugin 都会被执行
可以通过 filter 配置项为插件添加一个过滤器,通过过滤器的执行结果控制插件是否执行
APISIX 的插件是热加载的
curl http://apisix:9180/apisix/admin/plugins/reload -H 'X-API-KEY: edd1c9f034335f136f87ad84b625c8f1' -X PUT
如果在 Route 里配置了某个 Plugin,但在配置文件中禁用了该 Plugin,则在执行 Route 时会跳过该 Plugin
创建 Route
1
2
3
4
5
6
7
8
9
10
11
12
13
14
15
16
17
18
19
20
21
$ curl http: -H 'X-API-KEY: edd1c9f034335f136f87ad84b625c8f1' -X PUT -d \ '{ "uri" : "/get" , "plugins" : { "proxy-rewrite" : { "_meta" : { "filter" : [ [ "arg_version" , "==" , "v2" ] ] } , "uri" : "/anything" } } , "upstream" : { "type" : "roundrobin" , "nodes" : { "httpbin.org:80" : 1 } } } '
不携带参数,proxy-rewrite 插件不会执行,请求被转发到上游的 /get
1
2
3
4
5
6
7
8
9
10
11
12
13
14
15
16
17
18
19
20
21
22
23
24
25
26
27
28
29
30
31
32
33
34
35
36
$ curl -v /dev/null : * URL rejected: No host part in the URL * Closing connection curl: (3 ) URL rejected: No host part in the URL * Trying 192.168 .191 .175 : 9080. .. * Connected to apisix (192.168 .191 .175 ) port 9080 > GET /get HTTP/1.1 > Host: httpbin.org > User-Agent: curl/8.4 .0 > Accept: * *", " Host": " httpbin.org", " User-Agent": " curl/8.4 .0 ", " X-Amzn-Trace-Id": " Root=1 -660e963 d-6 f540ee273b539db5066675d", " X-Forwarded-Host": " httpbin.org" }, " origin": " 127.0 .0 .1 , 129.227 .149 .219 ", " url": " http: } * Connection #0 to host apisix left intact
携带参数 version=v2 时,则 proxy-rewrite 插件会执行,请求被转发到上游的 /anything
1
2
3
4
5
6
7
8
9
10
11
12
13
14
15
16
17
18
19
20
21
22
23
24
25
26
27
28
29
30
31
32
33
34
35
36
37
38
39
40
41
42
43
$ curl -v /dev/null : * URL rejected: No host part in the URL * Closing connection curl: (3 ) URL rejected: No host part in the URL * Trying 192.168 .191 .175 : 9080. .. * Connected to apisix (192.168 .191 .175 ) port 9080 > GET /get?version=v2 HTTP/1.1 > Host: httpbin.org > User-Agent: curl/8.4 .0 > Accept: * *", " Host": " httpbin.org", " User-Agent": " curl/8.4 .0 ", " X-Amzn-Trace-Id": " Root=1 -660e96 ca-13 a4caa52b644579553bedad", " X-Forwarded-Host": " httpbin.org" }, " json": null, " method": " GET", " origin": " 127.0 .0 .1 , 129.227 .149 .219 ", " url": " http: } * Connection #0 to host apisix left intact
Plugin Config
在不同的 Route 会使用相同的 Plugin 规则,可以通过 Plugin Config 来设置这些规则
Plugin Config 属于一组通用插件配置的抽象
plugins 的配置可以通过 Admin API /apisix/admin/plugin_configs 进行单独配置,在 Route 中使用 plugin_config_id 与之进行关联
对于同一个插件的配置,只能有一个是有效的
优先级为 Consumer > Route > Plugin Config > Service
创建 Plugin Config
1
2
3
4
5
6
7
8
9
10
11
12
$ curl http: -H 'X-API-KEY: edd1c9f034335f136f87ad84b625c8f1' -X PUT -i -d ' { "desc" : "enable limit-count plugin" , "plugins" : { "limit-count" : { "count" : 2 , "time_window" : 60 , "rejected_code" : 503 } } } '
创建 Route 并绑定 Plugin Config(如果找不到 Plugin Config,则在该 Route 上的请求会 503)
1
2
3
4
5
6
7
8
9
10
11
12
$ curl http: -H 'X-API-KEY: edd1c9f034335f136f87ad84b625c8f1' -X PUT -i -d ' { "uris" : [ "/index.html" ] , "plugin_config_id" : 1 , "upstream" : { "type" : "roundrobin" , "nodes" : { "127.0.0.1:1980" : 1 } } } '
如果 Route 中已经配置了 plugins,那么 Plugin Config 里的插件配置合并 plugins 的插件配置
创建 Plugin Config
1
2
3
4
5
6
7
8
9
10
11
12
13
14
15
16
17
18
$ curl http: -H 'X-API-KEY: edd1c9f034335f136f87ad84b625c8f1' -X PUT -i -d ' { "desc" : "enable ip-restruction and limit-count plugin" , "plugins" : { "ip-restriction" : { "whitelist" : [ "127.0.0.0/24" , "113.74.26.106" ] } , "limit-count" : { "count" : 2 , "time_window" : 60 , "rejected_code" : 503 } } } '
在 Route 中引入 Plugin Config
1
2
3
4
5
6
7
8
9
10
11
12
13
14
15
16
17
18
19
20
21
22
23
24
$ curl http: -H 'X-API-KEY: edd1c9f034335f136f87ad84b625c8f1' -X PUT -i -d ' { "uris" : [ "/index.html" ] , "plugin_config_id" : 1 , "upstream" : { "type" : "roundrobin" , "nodes" : { "127.0.0.1:1980" : 1 } } , "plugins" : { "proxy-rewrite" : { "uri" : "/test/add" , "host" : "apisix.iresty.com" } , "limit-count" : { "count" : 20 , "time_window" : 60 , "rejected_code" : 503 , "key" : "remote_addr" } } } '
合并后的效果
1
2
3
4
5
6
7
8
9
10
11
12
13
14
15
16
17
18
19
20
21
22
23
24
25
26
27
28
29
$ curl http: -H 'X-API-KEY: edd1c9f034335f136f87ad84b625c8f1' -X PUT -i -d ' { "uris" : [ "/index.html" ] , "upstream" : { "type" : "roundrobin" , "nodes" : { "127.0.0.1:1980" : 1 } } , "plugins" : { "ip-restriction" : { "whitelist" : [ "127.0.0.0/24" , "113.74.26.106" ] } , "proxy-rewrite" : { "uri" : "/test/add" , "host" : "apisix.iresty.com" } , "limit-count" : { "count" : 20 , "time_window" : 60 , "rejected_code" : 503 , "key" : "remote_addr" } } } '
在 APISIX 中,配置通用的元数据属性,可以作用于包含该元数据插件的所有 Route 及 Service 中
为 rocketmq-logger 指定了 log_format,则所有绑定 rocketmq-logger 的 Route 或 Service 都将使用该日志格式
在插件级别设置的元数据属性更加精细,并且比全局元数据对象具有更高的优先级
插件元数据对象只能用于具有元数据属性的插件
配置 Plugin Metadata
1
2
3
4
5
6
7
8
9
$ curl http: -H 'X-API-KEY: edd1c9f034335f136f87ad84b625c8f1' -X PUT -d ' { "log_format" : { "host" : "$host" , "@timestamp" : "$time_iso8601" , "client_ip" : "$remote_addr" } } '
Route
Route 是 APISIX 中最基础和最核心的资源对象
APISIX 通过 Route 定义规则来匹配客户端请求,根据匹配结果加载并执行相应的插件,最后将请求转发给到指定的上游服务
组成部分
匹配规则 - uri、host、remote_addr 等
插件配置
上游信息 - 负载均衡
配置范式
可以在 Route 中完成所有参数的配置,相对独立
当 Route 中有比较多的重复配置,可以通过配置 Service 和 Upstream 的 ID 或者其他对象的 ID 来完成路由配置
APISIX 所有的资源对象的 ID,均使用字符串格式
当资源对象的 ID 大于 14 个字符时,请务必使用字符串形式表示该资源对象
1
2
3
4
5
6
7
$ curl -i http: -H 'X-API-KEY: edd1c9f034335f136f87ad84b625c8f1' -X PUT -d ' { "uri" : "/index.html" , "plugin_config_id" : "123456789apacheapisix" , "upstream_id" : "1" } '
Router
允许用户选择不同 Router 来更好匹配自由业务,在性能、自由之间做最适合选择
apisix.router.http - HTTP 请求路由
radixtree_uri
只使用 uri 作为主索引
基于 radixtree 引擎,支持全量和深前缀匹配
绝对匹配 - /foo/bar
前缀匹配 - /foo*
匹配优先级
radixtree_uri_with_parameter
radixtree_host_uri
使用 host + uri 作为主索引
基于 radixtree 引擎,对当前请求会同时匹配 host 和 uri,支持的匹配条件与 radixtree_uri 基本一致
在 3.2 之前,默认使用 radixtree_uri 作为默认路由
性能:radixtree_uri > radixtree_host_uri
apisix.router.ssl - SSL 加载匹配路由
radixtree_sni
使用 SNI - Server Name Indication 作为主索引
基于 radixtree 引擎
Script
Script 表示将在 HTTP 请求/响应生命周期期间执行的脚本
Script 配置需要绑定在 Route 上
Script 与 Plugin 不兼容,并且 Script 优先执行
这意味着配置 Script 后,Route 上配置的 Plugin 将不被执行
在 Script 中可以编写任意 Lua 代码,可以直接调用已有的插件以复用已有的代码
Script 支持 access、header_filter、body_filter 和 log 阶段
系统会在相应阶段中自动执行 Script 脚本中对应阶段的代码
Service
Service 是某类 API 的抽象,即一组 Route 的抽象
Service 通常与上游服务抽象是一一对应的,但与 Route 之间,通常是 1:N 即一对多的关系
不同 Route 同时绑定到一个 Service 上,这些 Route 将具有相同的 Upstream 和 Plugin 配置,减少冗余配置
当 Route 和 Service 都开启同一个插件时,Route 中的插件优先级高于 Service 中的插件
创建 Service
1
2
3
4
5
6
7
8
9
10
11
12
13
14
15
16
17
18
$ curl http: -H 'X-API-KEY: edd1c9f034335f136f87ad84b625c8f1' -X PUT -d ' { "plugins" : { "limit-count" : { "count" : 2 , "time_window" : 60 , "rejected_code" : 503 , "key" : "remote_addr" } } , "upstream" : { "type" : "roundrobin" , "nodes" : { "127.0.0.1:1980" : 1 } } } '
创建 Route 并绑定 Service
1
2
3
4
5
6
7
$ curl http: -H 'X-API-KEY: edd1c9f034335f136f87ad84b625c8f1' -X PUT -d ' { "methods" : [ "GET" ] , "uri" : "/index.html" , "service_id" : "200" } '
1
2
3
4
5
6
7
$ curl http: -H 'X-API-KEY: edd1c9f034335f136f87ad84b625c8f1' -X PUT -d ' { "methods" : [ "GET" ] , "uri" : "/foo/index.html" , "service_id" : "200" } '
为 Route 指定不同的插件配置或者 Upstream
1
2
3
4
5
6
7
8
9
10
11
12
13
14
15
$ curl http: -H 'X-API-KEY: edd1c9f034335f136f87ad84b625c8f1' -X PUT -d ' { "uri" : "/bar/index.html" , "id" : "102" , "service_id" : "200" , "plugins" : { "limit-count" : { "count" : 2000 , "time_window" : 60 , "rejected_code" : 503 , "key" : "remote_addr" } } } '
Upstream
Upstream 是对虚拟主机抽象,即应用层服务或节点的抽象
可以通过 Upstream 对象对多个服务节点按照配置规则进行负载均衡
当多个Route(或 Service)使用该 Upstream 时,可以单独创建 Upstream 对象
在 Route 中通过使用 upstream_id 的方式引用资源,减轻维护压力
可以将 Upstream 的信息直接配置在指定 Route 或 Service 中,不过 Route 中的配置优先级更高
Upstream 对象除了基本的负载均衡算法外,还支持对上游做主被动健康检查、重试等逻辑
创建 Upstream - chash
1
2
3
4
5
6
7
8
9
10
$ curl http: -H 'X-API-KEY: edd1c9f034335f136f87ad84b625c8f1' -X PUT -d ' { "type" : "chash" , "key" : "remote_addr" , "nodes" : { "127.0.0.1:80" : 1 , "httpbin.org:80" : 2 } } '
在 Route 中引用 Upstream
1
2
3
4
5
6
$ curl http: -H 'X-API-KEY: edd1c9f034335f136f87ad84b625c8f1' -X PUT -d ' { "uri" : "/index.html" , "upstream_id" : 1 } '
将 Upstream 信息直接配置在 Route 或者 Service 中
1
2
3
4
5
6
7
8
9
10
11
12
13
14
15
16
17
18
19
$ curl http: -H 'X-API-KEY: edd1c9f034335f136f87ad84b625c8f1' -X PUT -d ' { "uri" : "/index.html" , "plugins" : { "limit-count" : { "count" : 2 , "time_window" : 60 , "rejected_code" : 503 , "key" : "remote_addr" } } , "upstream" : { "type" : "roundrobin" , "nodes" : { "127.0.0.1:1980" : 1 } } } '
配置健康检查
1
2
3
4
5
6
7
8
9
10
11
12
13
14
15
16
17
18
19
20
21
22
23
24
25
26
27
28
29
30
31
32
33
34
$ curl http: -H 'X-API-KEY: edd1c9f034335f136f87ad84b625c8f1' -X PUT -d ' { "uri" : "/index.html" , "plugins" : { "limit-count" : { "count" : 2 , "time_window" : 60 , "rejected_code" : 503 , "key" : "remote_addr" } } , "upstream" : { "nodes" : { "127.0.0.1:1980" : 1 } , "type" : "roundrobin" , "retries" : 2 , "checks" : { "active" : { "http_path" : "/status" , "host" : "foo.com" , "healthy" : { "interval" : 2 , "successes" : 1 } , "unhealthy" : { "interval" : 1 , "http_failures" : 2 } } } } } '
创建 Consumer
1
2
3
4
5
6
7
8
9
10
$ curl http: -H 'X-API-KEY: edd1c9f034335f136f87ad84b625c8f1' -X PUT -d ' { "username" : "jack" , "plugins" : { "key-auth" : { "key" : "auth-jack" } } } '
创建 Route,启用 key-auth 插件,hash_on: consumer
1
2
3
4
5
6
7
8
9
10
11
12
13
14
15
16
$ curl http: -H 'X-API-KEY: edd1c9f034335f136f87ad84b625c8f1' -X PUT -d ' { "plugins" : { "key-auth" : { } } , "upstream" : { "nodes" : { "127.0.0.1:1980" : 1 , "127.0.0.1:1981" : 1 } , "type" : "chash" , "hash_on" : "consumer" } , "uri" : "/server_port" } '
认证通过后的 consumer_name 作为负载均衡哈希算法的哈希值
hash_on: cookie.sid
1
2
3
4
5
6
7
8
9
10
11
12
13
14
$ curl http: -H 'X-API-KEY: edd1c9f034335f136f87ad84b625c8f1' -X PUT -d ' { "uri" : "/hash_on_cookie" , "upstream" : { "key" : "sid" , "type" : "chash" , "hash_on" : "cookie" , "nodes" : { "127.0.0.1:1980" : 1 , "127.0.0.1:1981" : 1 } } } '
1
2
3
$ curl http: -H 'X-API-KEY: edd1c9f034335f136f87ad84b625c8f1' \ -H "Cookie: sid=3c183a30cffcda1408daf1c61d47b274"
hash_on: header.content-type
1
2
3
4
5
6
7
8
9
10
11
12
13
14
$ curl http: -H 'X-API-KEY: edd1c9f034335f136f87ad84b625c8f1' -X PUT -d ' { "uri" : "/hash_on_header" , "upstream" : { "key" : "content-type" , "type" : "chash" , "hash_on" : "header" , "nodes" : { "127.0.0.1:1980" : 1 , "127.0.0.1:1981" : 1 } } } '
1
2
3
$ curl http: -H 'X-API-KEY: edd1c9f034335f136f87ad84b625c8f1' \ -H "Content-Type: application/json"
Secret
Secret 指 APISIX 运行过程中所需的任何敏感信息,可能是核心配置的一部分,也可能是插件中的一些敏感信息
常见 Secret
一些组件(etcd、Redis、Kafka 等)的用户名、密码
证书的私钥
API 密钥
敏感的插件配置字段,通常用于身份验证、hash、签名或加密
APISIX Secret 允许用户在 APISIX 中通过一些密钥管理服务(Vault 等)来存储密钥
在使用的时候根据 key 进行读取,确保密钥在整个平台中不以明文的形式存在
支持方式
Plugin General batch-requests
过程
用户可以通过将多个请求组装成一个请求的形式,把请求发送给网关
网关会从请求体中解析出对应的请求,再分别封装成独立的请求
以 HTTP pipeline 的方式代替用户向网关自身再发起多个 HTTP 请求
经历路由匹配,转发到对应上游等多个阶段,合并结果后再返回客户端
在客户端需要访问多个 API 的情况下,这将显著提高性能
用户原始请求中的请求头(除了以 Content- 开始的请求头,例如:Content-Type)将被赋给 HTTP pipeline 中的每个请求
对于网关来说,这些以 HTTP pipeline 方式发送给自身的请求与用户直接发起的外部请求没有什么不同
只能访问已经配置好的路由,并将经历完整的鉴权过程,因此不存在安全问题
如果原始请求的请求头与插件中配置的请求头冲突,则以插件中配置的请求头优先
redirect
配置 URI 重定向
启用插件 - 可以在新的 URI 中使用 Nginx 内置的任意变量
1
2
3
4
5
6
7
8
9
10
11
12
13
14
15
16
17
$ curl http: -H 'X-API-KEY: edd1c9f034335f136f87ad84b625c8f1' -X PUT -d ' { "uri" : "/test/index.html" , "plugins" : { "redirect" : { "uri" : "/test/default.html" , "ret_code" : 301 } } , "upstream" : { "type" : "roundrobin" , "nodes" : { "127.0.0.1:80" : 1 } } } '
测试插件
1
2
3
4
5
6
7
8
9
10
11
12
13
14
15
16
17
18
19
$ curl http: HTTP/1.1 301 Moved Permanently Date: Thu, 04 Apr 2024 13 : 49 : 18 GMT Content-Type: text/html Content-Length: 241 Connection: keep-alive X-RateLimit-Limit: 2 X-RateLimit-Remaining: 1 X-RateLimit-Reset: 60 Location: /test/default.html Server: APISIX/3.8 .0 <html> <head><title>301 Moved Permanently</title></head> <body> <center><h1>301 Moved Permanently</h1></center> <hr><center>openresty</center> <p><em>Powered by <a href="https://apisix.apache.org/" >APISIX</a>.</em></p></body> </html>
将 HTTP 重定向到 HTTPS
1
2
3
4
5
6
7
8
9
10
$ curl http: -H 'X-API-KEY: edd1c9f034335f136f87ad84b625c8f1' -X PUT -d ' { "uri" : "/hello" , "plugins" : { "redirect" : { "http_to_https" : true } } } '
测试插件
1
2
3
4
5
6
7
8
9
10
11
12
13
14
15
16
17
18
19
$ curl http: HTTP/1.1 301 Moved Permanently Date: Thu, 04 Apr 2024 13 : 50 : 58 GMT Content-Type: text/html Content-Length: 241 Connection: keep-alive X-RateLimit-Limit: 2 X-RateLimit-Remaining: 1 X-RateLimit-Reset: 60 Location: https: Server: APISIX/3.8 .0 <html> <head><title>301 Moved Permanently</title></head> <body> <center><h1>301 Moved Permanently</h1></center> <hr><center>openresty</center> <p><em>Powered by <a href="https://apisix.apache.org/" >APISIX</a>.</em></p></body> </html>
删除插件 - 删除对应的 JSON 配置即可,APISIX 支持配置热更新
1
2
3
4
5
6
7
8
9
10
11
12
$ curl http: -H 'X-API-KEY: edd1c9f034335f136f87ad84b625c8f1' -X PUT -d ' { "uri" : "/test/index.html" , "plugins" : { } , "upstream" : { "type" : "roundrobin" , "nodes" : { "127.0.0.1:80" : 1 } } } '
测试插件
1
2
3
4
5
6
7
8
9
10
11
12
$ curl http: HTTP/1.1 404 Not Found Date: Thu, 04 Apr 2024 13 : 52 : 49 GMT Content-Type: text/plain; charset=utf-8 Transfer-Encoding: chunked Connection: keep-alive X-RateLimit-Limit: 2 X-RateLimit-Remaining: 1 X-RateLimit-Reset: 60 Server: APISIX/3.8 .0 { "error_msg" : "404 Route Not Found" }
echo
帮助用户尽可能地全面了解如何开发 APISIX 插件
启用插件
1
2
3
4
5
6
7
8
9
10
11
12
13
14
15
16
$ curl http: -H 'X-API-KEY: edd1c9f034335f136f87ad84b625c8f1' -X PUT -d ' { "plugins" : { "echo" : { "before_body" : "before the body modification " } } , "upstream" : { "nodes" : { "127.0.0.1:1980" : 1 } , "type" : "roundrobin" } , "uri" : "/hello" } '
测试插件
1
2
3
4
5
6
7
8
9
10
11
12
13
14
15
16
17
18
19
$ curl -i http: HTTP/1.1 502 Bad Gateway Date: Thu, 04 Apr 2024 13 : 57 : 08 GMT Content-Type: text/html; charset=utf-8 Transfer-Encoding: chunked Connection: keep-alive X-RateLimit-Limit: 2 X-RateLimit-Remaining: 1 X-RateLimit-Reset: 60 Server: APISIX/3.8 .0 X-APISIX-Upstream-Status: 502 before the body modification <html> <head><title>502 Bad Gateway</title></head> <body> <center><h1>502 Bad Gateway</h1></center> <hr><center>openresty</center> <p><em>Powered by <a href="https://apisix.apache.org/" >APISIX</a>.</em></p></body> </html>
gzip
要求 Apache APISIX 运行在 APISIX-Runtime 上
gzip 插件能动态设置 NGINX 的压缩行为
当启用 gzip 插件时,客户端在发起请求时需要在请求头中添加 Accept-Encoding: gzip,以表明客户端支持 gzip 压缩
APISIX 在接收到请求后,会根据客户端的支持情况和服务器配置动态判断是否对响应内容进行 gzip 压缩
如果判定条件得到满足,APISIX 将在响应头中添加 Content-Encoding: gzip 字段,以指示响应内容已经通过 gzip 压缩
在客户端接收到响应后,根据响应头中的 Content-Encoding 字段使用相应的解压缩算法对响应内容进行解压,从而获取原始的响应内容
启用插件
1
2
3
4
5
6
7
8
9
10
11
12
13
14
15
16
17
18
$ curl -i http: -H 'X-API-KEY: edd1c9f034335f136f87ad84b625c8f1' -X PUT -d ' { "uri" : "/index.html" , "plugins" : { "gzip" : { "buffers" : { "number" : 8 } } } , "upstream" : { "type" : "roundrobin" , "nodes" : { "httpbin.org:80" : 1 } } } '
测试插件
1
2
3
4
5
6
7
8
9
10
11
12
13
14
15
16
17
$ curl http: HTTP/1.1 404 NOT FOUND Content-Type: text/html; charset=utf-8 Transfer-Encoding: chunked Connection: keep-alive X-RateLimit-Limit: 2 X-RateLimit-Remaining: 1 X-RateLimit-Reset: 60 Date: Thu, 04 Apr 2024 14 : 04 : 55 GMT Access-Control-Allow-Origin: * Access-Control-Allow-Credentials: true Server: APISIX/3.8 .0 Content-Encoding: gzip Warning: Binary output can mess up your terminal. Use "--output -" to tell Warning: curl to output it to your terminal anyway, or consider "--output Warning: <FILE>" to save to a file.
real-ip
该插件要求 APISIX 运行在 APISIX-Runtime 上
用于动态改变传递到 Apache APISIX 的客户端的 IP 地址和端口
启用插件
1
2
3
4
5
6
7
8
9
10
11
12
13
14
15
16
17
18
19
20
21
22
23
$ curl -i http: -H 'X-API-KEY: edd1c9f034335f136f87ad84b625c8f1' -X PUT -d ' { "uri" : "/index.html" , "plugins" : { "real-ip" : { "source" : "arg_realip" , "trusted_addresses" : [ "127.0.0.0/24" ] } , "response-rewrite" : { "headers" : { "remote_addr" : "$remote_addr" , "remote_port" : "$remote_port" } } } , "upstream" : { "type" : "roundrobin" , "nodes" : { "httpbin.org:80" : 1 } } } '
测试插件
1
2
3
4
5
6
7
8
9
10
11
12
13
14
$ curl 'http: HTTP/1.1 404 NOT FOUND Content-Type: text/html; charset=utf-8 Content-Length: 233 Connection: keep-alive X-RateLimit-Limit: 2 X-RateLimit-Remaining: 1 X-RateLimit-Reset: 60 Date: Thu, 04 Apr 2024 14 : 13 : 41 GMT Access-Control-Allow-Origin: * Access-Control-Allow-Credentials: true Server: APISIX/3.8 .0 remote-port: 9080 remote-addr: 1.2 .3 .4
server-info
定期将服务基本信息上报至 etcd
1
2
3
4
5
6
7
8
$ curl http://apisix:9090/v1/server_info -s | jq . { "id": "58c96e4d-5322-49fe-ad2c-64d1437b6dff", "version": "3.8.0", "boot_time": 1712217096, "etcd_version": "3.5.0", "hostname": "apisix-5f99bbf5fc-ndqnv" }
response-rewrite
支持修改上游服务或 APISIX 返回的 Body 和 Header 信息
适用场景
通过设置 Access-Control-Allow-* 字段实现 CORS(跨域资源共享)的功能
通过设置标头中的 status_code 和 Location 字段实现重定向,如果仅需要重定向功能,建议使用 redirect 插件
启用插件
1
2
3
4
5
6
7
8
9
10
11
12
13
14
15
16
17
18
19
20
21
22
23
24
25
$ curl http: -H 'X-API-KEY: edd1c9f034335f136f87ad84b625c8f1' -X PUT -d ' { "methods" : [ "GET" ] , "uri" : "/test/index.html" , "plugins" : { "response-rewrite" : { "body" : "{\"code\":\"ok\",\"message\":\"new json body\"}" , "headers" : { "set" : { "X-Server-id" : 3 , "X-Server-status" : "on" , "X-Server-balancer-addr" : "$balancer_ip:$balancer_port" } } } } , "upstream" : { "type" : "roundrobin" , "scheme" : "https" , "nodes" : { "httpbin.org:443" : 1 } } } '
测试插件
1
2
3
4
5
6
7
8
9
10
11
12
13
14
15
16
17
$ curl -X GET -i http: HTTP/1.1 404 NOT FOUND Content-Type: text/html; charset=utf-8 Transfer-Encoding: chunked Connection: keep-alive X-RateLimit-Limit: 2 X-RateLimit-Remaining: 1 X-RateLimit-Reset: 60 Date: Thu, 04 Apr 2024 14 : 47 : 18 GMT Access-Control-Allow-Origin: * Access-Control-Allow-Credentials: true Server: APISIX/3.8 .0 X-Server-balancer-addr: 54.147 .29 .229 : 80 X-Server-id: 3 X-Server-status: on { "code" : "ok" , "message" : "new json body" }
filters, X-Amzn-Trace-Id -> X-Amzn-Trace-Id-Replace
1
2
3
4
5
6
7
8
9
10
11
12
13
14
15
16
17
18
19
20
21
22
23
24
25
26
27
28
29
30
31
32
33
34
35
36
$ curl http: { "plugins" : { "response-rewrite" : { "headers" : { "set" : { "X-Server-id" : 3 , "X-Server-status" : "on" , "X-Server-balancer-addr" : "$balancer_ip:$balancer_port" } } , "filters" : [ { "regex" : "X-Amzn-Trace-Id" , "scope" : "global" , "replace" : "X-Amzn-Trace-Id-Replace" } ] , "vars" : [ [ "status" , "==" , 200 ] ] } } , "upstream" : { "type" : "roundrobin" , "scheme" : "https" , "nodes" : { "httpbin.org:443" : 1 } } , "uri" : "/*" } '
1
2
3
4
5
6
7
8
9
10
11
12
13
14
15
16
17
18
19
20
21
22
23
24
25
$ curl -X GET -i http: HTTP/1.1 200 OK Content-Type: application/json Transfer-Encoding: chunked Connection: keep-alive Date: Thu, 04 Apr 2024 15 : 00 : 15 GMT Access-Control-Allow-Origin: * Access-Control-Allow-Credentials: true Server: APISIX/3.8 .0 X-Server-status: on X-Server-balancer-addr: 52.201 .199 .27 : 443 X-Server-id: 3 { "args" : { } , "headers" : { "Accept" : "*/*" , "Host" : "apisix" , "User-Agent" : "curl/8.4.0" , "X-Amzn-Trace-Id-Replace" : "Root=1-660ec07f-3409b99612877cb55813e41a" , "X-Forwarded-Host" : "apisix" } , "origin" : "127.0.0.1, 129.227.149.219" , "url" : "https://apisix/get" }
proxy-rewrite
处理 Upstream 代理信息重写的插件,支持对 scheme、uri、host 等信息进行重写
启用插件
1
2
3
4
5
6
7
8
9
10
11
12
13
14
15
16
17
18
19
20
21
22
23
24
25
26
27
28
29
30
31
32
$ curl http: -H 'X-API-KEY: edd1c9f034335f136f87ad84b625c8f1' -X PUT -d ' { "methods" : [ "GET" ] , "uri" : "/test/index.html" , "plugins" : { "proxy-rewrite" : { "uri" : "/test/home.html" , "host" : "iresty.com" , "headers" : { "set" : { "X-Api-Version" : "v1" , "X-Api-Engine" : "apisix" , "X-Api-useless" : "" } , "add" : { "X-Request-ID" : "112233" } , "remove" : [ "X-test" ] } } } , "upstream" : { "type" : "roundrobin" , "scheme" : "https" , "nodes" : { "httpbin.org:443" : 1 } } } '
测试插件
1
2
3
4
5
$ curl -X GET http://apisix:9080/test/index.html <!DOCTYPE HTML PUBLIC "-//W3C//DTD HTML 3.2 Final//EN"> <title>404 Not Found</title> <h1>Not Found</h1> <p>The requested URL was not found on the server. If you entered the URL manually please check your spelling and try again.</p>
APISIX access.log
1 127.0.0.1 - - [04/Apr/2024:15:10:26 +0000] apisix:9080 "GET /test/index.html HTTP/1.1" 404 233 1.000 "-" "curl/8.4.0" 184.73.70.187:443 404 0.987 "https://iresty.com/test/home.html"
grpc-transcode
可以在 HTTP 和 gRPC 请求之间进行转换
APISIX 接收 HTTP 请求后,首先对请求进行转码,并将转码后的请求转发到 gRPC 服务,获取响应并以 HTTP 格式将其返回给客户端
fault-injection
可以和其他插件一起使用,并在其他插件执行前被执行
启用插件
1
2
3
4
5
6
7
8
9
10
11
12
13
14
15
16
17
18
19
$ curl http: -H 'X-API-KEY: edd1c9f034335f136f87ad84b625c8f1' -X PUT -d ' { "plugins" : { "fault-injection" : { "abort" : { "http_status" : 200 , "body" : "Fault Injection!" } } } , "upstream" : { "nodes" : { "127.0.0.1:1980" : 1 } , "type" : "roundrobin" } , "uri" : "/hello" } '
测试插件
1
2
3
4
5
6
7
8
9
$ curl http: HTTP/1.1 200 OK Date: Thu, 04 Apr 2024 15 : 19 : 13 GMT Content-Type: text/plain; charset=utf-8 Transfer-Encoding: chunked Connection: keep-alive Server: APISIX/3.8 .0 Fault Injection!
指定 delay 属性
1
2
3
4
5
6
7
8
9
10
11
12
13
14
15
16
17
18
19
$ curl http: -H 'X-API-KEY: edd1c9f034335f136f87ad84b625c8f1' -X PUT -d ' { "plugins" : { "fault-injection" : { "delay" : { "duration" : 3 } } } , "upstream" : { "nodes" : { "httpbin.org:443" : 1 } , "scheme" : "https" , "type" : "roundrobin" } , "uri" : "/hello" } '
指定 vars 规则
1
2
3
4
5
6
7
8
9
10
11
12
13
14
15
16
17
18
19
20
21
22
23
24
$ curl http: { "plugins" : { "fault-injection" : { "abort" : { "http_status" : 403 , "body" : "Fault Injection!\n" , "vars" : [ [ [ "arg_name" , "==" , "jack" ] ] ] } } } , "upstream" : { "type" : "roundrobin" , "scheme" : "https" , "nodes" : { "httpbin.org:443" : 1 } } , "uri" : "/*" } '
1
2
3
4
5
6
7
8
9
10
11
12
13
14
15
16
17
18
19
20
21
22
23
24
$ curl -X GET -i http: HTTP/1.1 200 OK Content-Type: application/json Content-Length: 326 Connection: keep-alive Date: Thu, 04 Apr 2024 15 : 29 : 41 GMT Access-Control-Allow-Origin: * Access-Control-Allow-Credentials: true Server: APISIX/3.8 .0 { "args" : { "name" : "allen" } , "headers" : { "Accept" : "*/*" , "Host" : "apisix" , "User-Agent" : "curl/8.4.0" , "X-Amzn-Trace-Id" : "Root=1-660ec764-1086ce3d2e15026224dda734" , "X-Forwarded-Host" : "apisix" } , "origin" : "127.0.0.1, 129.227.149.219" , "url" : "https://apisix/get?name=allen" }
1
2
3
4
5
6
7
8
9
$ curl -X GET -i "http://apisix:9080/get?name=jack" HTTP/1.1 403 Forbidden Date: Thu, 04 Apr 2024 15 : 30 : 03 GMT Content-Type: text/plain; charset=utf-8 Transfer-Encoding: chunked Connection: keep-alive Server: APISIX/3.8 .0 Fault Injection!
mocking
将随机返回指定格式的模拟数据,并且请求不会转发到上游
Authentication key-auth
用于向 Route 或 Service 添加身份验证密钥(API key)
需要与 Consumer 一起配合才能工作,通过 Consumer 将其密钥添加到 Query 或 Header 中以验证其请求
不同的 Consumer 应有不同的 key,它应当是唯一的
创建 Consumer
1
2
3
4
5
6
7
8
9
10
$ curl http: -H 'X-API-KEY: edd1c9f034335f136f87ad84b625c8f1' -X PUT -d ' { "username" : "jack" , "plugins" : { "key-auth" : { "key" : "auth-one" } } } '
创建 Route
1
2
3
4
5
6
7
8
9
10
11
12
13
14
15
16
$ curl http: -H 'X-API-KEY: edd1c9f034335f136f87ad84b625c8f1' -X PUT -d ' { "methods" : [ "GET" ] , "uri" : "/index.html" , "id" : 1 , "plugins" : { "key-auth" : { } } , "upstream" : { "type" : "roundrobin" , "nodes" : { "web1:80" : 1 } } } '
测试插件
1
2
3
4
5
6
7
8
9
$ curl http: HTTP/1.1 200 OK Content-Type: text/html; charset=utf-8 Content-Length: 10 Connection: keep-alive Date: Fri, 05 Apr 2024 05 : 48 : 53 GMT Server: APISIX/3.9 .0 hello web1
1
2
3
4
5
6
7
8
9
$ curl http: HTTP/1.1 401 Unauthorized Date: Fri, 05 Apr 2024 05 : 49 : 14 GMT Content-Type: text/html; charset=utf-8 Transfer-Encoding: chunked Connection: keep-alive Server: APISIX/3.9 .0 { "message" : "Missing API key found in request" }
1 2 3 4 5 6 7 8 9 $ curl http: HTTP/1.1 401 Unauthorized Date: Fri, 05 Apr 2024 05 : 49 : 39 GMT Content-Type: text/html; charset=utf-8 Transfer-Encoding: chunked Connection: keep-alive Server: APISIX/3.9 .0 { "message" : "Invalid API key in request" }
basic-auth
可以将 Basic_access_authentication 添加到 Route 或 Service 中
需要与 Consumer 一起使用,API 的消费者可以将它们的密钥添加到 Header 中以验证其请求
Consumer 的 username 是唯一的
创建 Consumer
1 2 3 4 5 6 7 8 9 10 11 $ curl http: -H 'X-API-KEY: edd1c9f034335f136f87ad84b625c8f1' -X PUT -d ' { "username" : "foo" , "plugins" : { "basic-auth" : { "username" : "foo" , "password" : "bar" } } } '
创建 Route
1 2 3 4 5 6 7 8 9 10 11 12 13 14 15 $ curl http: -H 'X-API-KEY: edd1c9f034335f136f87ad84b625c8f1' -X PUT -d ' { "methods" : [ "GET" ] , "uri" : "/hello" , "plugins" : { "basic-auth" : { } } , "upstream" : { "type" : "roundrobin" , "nodes" : { "web1:80" : 1 } } } '
测试插件
1 2 3 4 5 6 7 8 9 $ curl -i -ufoo: bar http: HTTP/1.1 200 OK Content-Type: text/plain; charset=utf-8 Content-Length: 10 Connection: keep-alive Date: Fri, 05 Apr 2024 05 : 59 : 53 GMT Server: APISIX/3.9 .0 hello web1
1 2 3 4 5 6 7 8 9 10 $ curl -i http: HTTP/1.1 401 Unauthorized Date: Fri, 05 Apr 2024 06 : 00 : 13 GMT Content-Type: text/plain; charset=utf-8 Transfer-Encoding: chunked Connection: keep-alive WWW-Authenticate: Basic realm='.' Server: APISIX/3.9 .0 { "message" : "Missing authorization in request" }
1 2 3 4 5 6 7 8 9 $ curl -i -uaaa: bbb http: HTTP/1.1 401 Unauthorized Date: Fri, 05 Apr 2024 06 : 00 : 35 GMT Content-Type: text/plain; charset=utf-8 Transfer-Encoding: chunked Connection: keep-alive Server: APISIX/3.9 .0 { "message" : "Invalid user authorization" }
openid-connect
OpenID Connect(OIDC)是基于 OAuth 2.0 的身份认证协议
APISIX 可以与支持该协议的身份认证服务对接,实现对客户端请求的身份认证
ldap-auth
可用于给 Route 或 Service 添加 LDAP 身份认证
需要与 Consumer 一起配合使用,API 的调用方可以使用 basic authentication 与 LDAP 服务器进行认证
opa
可用于与 Open Policy Agent 进行集成
实现后端服务的认证授权与访问服务等功能解耦,减少系统复杂性
APISIX 向 OPA 发送信息
1 2 3 4 5 6 7 8 9 10 11 12 13 14 15 16 17 18 19 20 21 22 23 24 25 26 { "type" : "http" , "request" : { "scheme" : "http" , "path" : "\/get" , "headers" : { "user-agent" : "curl\/7.68.0" , "accept" : "*\/*" , "host" : "127.0.0.1:9080" } , "query" : { } , "port" : 9080 , "method" : "GET" , "host" : "127.0.0.1" } , "var" : { "timestamp" : 1701234567 , "server_addr" : "127.0.0.1" , "server_port" : "9080" , "remote_port" : "port" , "remote_addr" : "ip address" } , "route" : { } , "service" : { } , "consumer" : { } }
OPA 向 APISIX 返回数据 - allow 必不可少,表示请求是否允许通过 APISIX 进行转发
1 2 3 4 5 6 7 8 9 10 { "result" : { "allow" : true , "reason" : "test" , "headers" : { "an" : "header" } , "status_code" : 401 } }
启动 OPA
1 $ docker run -d --name opa -p 8181 : 8181 openpolicyagent/opa: 0.64 .0 -dev-static-debug run -s
创建基本策略
1 2 3 4 5 6 7 8 9 10 11 12 13 $ curl -X PUT '127.0 .0 .1 : 8181 /v1/policies/example1' \ -H 'Content-Type: text/plain' \ -d 'package example1 import input.request default allow = false allow { # HTTP method must GET request.method == "GET" } '{ }
在 Route 上配置 OPA
1 2 3 4 5 6 7 8 9 10 11 12 13 14 15 16 17 18 $ curl -X PUT 'http: -H 'X-API-KEY: edd1c9f034335f136f87ad84b625c8f1' \ -H 'Content-Type: application/json' \ -d '{ "uri" : "/*" , "plugins" : { "opa" : { "host" : "http://127.0.0.1:8181" , "policy" : "example1" } } , "upstream" : { "nodes" : { "httpbin.org:80" : 1 } , "type" : "roundrobin" } } '
自定义响应
1 2 3 4 5 6 7 8 9 10 11 12 13 14 15 16 17 18 19 20 21 22 23 24 25 26 27 28 $ curl -X PUT '127.0 .0 .1 : 8181 /v1/policies/example2' \ -H 'Content-Type: text/plain' \ -d 'package example2 import input.request default allow = false allow { request.method == "GET" } # custom response body (Accepts a string or an object, the object will respond as JSON format) reason = "test" { not allow } # custom response header (The data of the object can be written in this way) headers = { "Location" : "http://example.com/auth" } { not allow } # custom response status code status_code = 302 { not allow } '
向 OPA 发送 API 更详细的数据(Route、Consumer 等)
1 2 3 4 5 6 7 8 9 10 11 12 13 14 15 16 17 18 19 $ curl -X PUT 'http: -H 'X-API-KEY: <api-key>' \ -H 'Content-Type: application/json' \ -d '{ "uri" : "/*" , "plugins" : { "opa" : { "host" : "http://127.0.0.1:8181" , "policy" : "echo" , "with_route" : true } } , "upstream" : { "nodes" : { "httpbin.org:80" : 1 } , "type" : "roundrobin" } } '
forward-auth
外部认证,当身份认证失败时,可以实现自定义错误或者重定向到认证页面的场景
将身份认证和授权逻辑移到了一个专门的外部服务中
APISIX 将用户的请求转发给认证服务并阻塞原始请求,然后在认证服务下以非 2xx 状态响应时进行结果替换
外部认证服务
1 2 3 4 5 6 7 8 9 10 11 12 13 14 15 16 17 18 19 20 21 22 23 24 25 $ curl -X PUT 'http: -H 'X-API-KEY: edd1c9f034335f136f87ad84b625c8f1' \ -H 'Content-Type: application/json' \ -d '{ "uri" : "/auth" , "plugins" : { "serverless-pre-function" : { "phase" : "rewrite" , "functions" : [ "return function (conf, ctx) local core = require(\"apisix.core\"); local authorization = core.request.header(ctx, \"Authorization\"); if authorization == \"123\" then core.response.exit(200); elseif authorization == \"321\" then core.response.set_header(\"X-User-ID\", \"i-am-user\"); core.response.exit(200); else core.response.set_header(\"Location\", \"http://example.com/auth\"); core.response.exit(403); end end" ] } } } '
在 Route 上启用 forward-auth 插件
1 2 3 4 5 6 7 8 9 10 11 12 13 14 15 16 17 18 19 $ curl -X PUT 'http: -H 'X-API-KEY: edd1c9f034335f136f87ad84b625c8f1' \ -d '{ "uri" : "/headers" , "plugins" : { "forward-auth" : { "uri" : "http://127.0.0.1:9080/auth" , "request_headers" : [ "Authorization" ] , "upstream_headers" : [ "X-User-ID" ] , "client_headers" : [ "Location" ] } } , "upstream" : { "nodes" : { "httpbin.org:80" : 1 } , "type" : "roundrobin" } } '
测试插件
1 2 3 4 5 6 7 8 9 10 11 $ curl http: { "headers" : { "Accept" : "*/*" , "Authorization" : "123" , "Host" : "127.0.0.1" , "User-Agent" : "curl/7.81.0" , "X-Amzn-Trace-Id" : "Root=1-660f9ce4-2087989e0669fb271564f5ff" , "X-Forwarded-Host" : "127.0.0.1" } }
1 2 3 4 5 6 7 8 9 10 11 12 $ curl http: { "headers" : { "Accept" : "*/*" , "Authorization" : "321" , "Host" : "127.0.0.1" , "User-Agent" : "curl/7.81.0" , "X-Amzn-Trace-Id" : "Root=1-660f9d26-36939c8453329d0041579cb6" , "X-Forwarded-Host" : "127.0.0.1" , "X-User-Id" : "i-am-user" } }
1 2 3 4 5 6 7 8 9 10 11 12 13 14 15 16 $ curl -i http: HTTP/1.1 403 Forbidden Date: Fri, 05 Apr 2024 06 : 42 : 05 GMT Content-Type: text/plain; charset=utf-8 Transfer-Encoding: chunked Connection: keep-alive Location: http: Server: APISIX/3.9 .0 <html> <head><title>403 Forbidden</title></head> <body> <center><h1>403 Forbidden</h1></center> <hr><center>openresty</center> <p><em>Powered by <a href="https://apisix.apache.org/" >APISIX</a>.</em></p></body> </html>
multi-auth
用于向 Route 或者 Service 中,添加多种身份验证方式
通过迭代 auth_plugins 属性指定的插件列表,提供了灵活的身份认证机制
允许多个 Consumer 在使用不同身份验证方式时共享相同的 Route - 认证链
创建多个使用不同身份认证插件的 Consumer
1 2 3 4 5 6 7 8 9 10 $ curl http: { "username" : "foo1" , "plugins" : { "basic-auth" : { "username" : "foo1" , "password" : "bar1" } } } '
1 2 3 4 5 6 7 8 9 $ curl http: { "username" : "foo2" , "plugins" : { "key-auth" : { "key" : "auth-one" } } } '
创建 Consumer
1 2 3 4 5 6 7 8 9 10 11 12 13 14 15 16 17 18 19 20 21 22 23 24 25 26 27 $ curl http: { "methods" : [ "GET" ] , "uri" : "/hello" , "plugins" : { "multi-auth" : { "auth_plugins" : [ { "basic-auth" : { } } , { "key-auth" : { "query" : "apikey" , "hide_credentials" : true , "header" : "apikey" } } ] } } , "upstream" : { "type" : "roundrobin" , "nodes" : { "web1:80" : 1 } } } '
验证插件
1 2 3 4 5 6 7 8 9 $ curl -i -ufoo1: bar1 http: HTTP/1.1 200 OK Content-Type: text/plain; charset=utf-8 Content-Length: 10 Connection: keep-alive Date: Fri, 05 Apr 2024 06 : 48 : 09 GMT Server: APISIX/3.9 .0 hello web1
1 2 3 4 5 6 7 8 9 10 $ curl http: HTTP/1.1 200 OK Content-Type: text/plain; charset=utf-8 Content-Length: 10 Connection: keep-alive WWW-Authenticate: Basic realm='.' Date: Fri, 05 Apr 2024 06 : 48 : 36 GMT Server: APISIX/3.9 .0 hello web1
1 2 3 4 5 6 7 8 9 10 $ curl http: HTTP/1.1 401 Unauthorized Date: Fri, 05 Apr 2024 06 : 48 : 53 GMT Content-Type: text/plain; charset=utf-8 Transfer-Encoding: chunked Connection: keep-alive WWW-Authenticate: Basic realm='.' Server: APISIX/3.9 .0 { "message" : "Authorization Failed" }
Security cors
为服务端启用 CORS(Cross-Origin Resource Sharing,跨域资源共享)的返回头
在 Route 上启用 cors 插件
1 2 3 4 5 6 7 8 9 10 11 12 13 $ curl http: { "uri" : "/hello" , "plugins" : { "cors" : { } } , "upstream" : { "type" : "roundrobin" , "nodes" : { "web1:80" : 1 } } } '
测试插件
1 2 3 4 5 6 7 8 9 10 11 12 13 14 15 16 17 18 19 20 21 22 23 $ curl http: * Trying 127.0 .0 .1 : 9080. .. * Connected to 127.0 .0 .1 (127.0 .0 .1 ) port 9080 (#0 ) > GET /hello HTTP/1.1 > Host: 127.0 .0 .1 : 9080 > User-Agent: curl/7.81 .0 > Accept: *
uri-blocker
通过指定一系列 block_rules 来拦截用户请求
启用插件
1 2 3 4 5 6 7 8 9 10 11 12 13 14 15 $ curl -i http: { "uri" : "/*" , "plugins" : { "uri-blocker" : { "block_rules" : [ "root.exe" , "root.m+" ] } } , "upstream" : { "type" : "roundrobin" , "nodes" : { "web1:80" : 1 } } } '
测试插件
1 2 3 4 5 6 7 8 9 10 11 12 13 14 15 $ curl -i http: HTTP/1.1 403 Forbidden Date: Fri, 05 Apr 2024 07 : 21 : 17 GMT Content-Type: text/html; charset=utf-8 Content-Length: 225 Connection: keep-alive Server: APISIX/3.9 .0 <html> <head><title>403 Forbidden</title></head> <body> <center><h1>403 Forbidden</h1></center> <hr><center>openresty</center> <p><em>Powered by <a href="https://apisix.apache.org/" >APISIX</a>.</em></p></body> </html>
ip-restriction
通过将 IP 地址列入白名单或黑名单来限制对服务或路由的访问
支持对单个 IP 地址、多个 IP 地址和类似 10.10.10.0/24 的 CIDR(无类别域间路由)范围的限制
whitelist 和 blacklist 属性无法同时在同一个服务或路由上使用,只能使用其中之一
启用插件
1 2 3 4 5 6 7 8 9 10 11 12 13 14 15 16 17 18 $ curl http: { "uri" : "/index.html" , "upstream" : { "type" : "roundrobin" , "nodes" : { "web1:80" : 1 } } , "plugins" : { "ip-restriction" : { "whitelist" : [ "127.0.0.1" , "113.74.26.106/24" ] } } } '
测试插件
1 2 3 4 5 6 7 8 9 $ curl http: HTTP/1.1 403 Forbidden Date: Fri, 05 Apr 2024 07 : 24 : 24 GMT Content-Type: text/html; charset=utf-8 Transfer-Encoding: chunked Connection: keep-alive Server: APISIX/3.9 .0 { "message" : "Your IP address is not allowed" }
ua-restriction
通过将指定 User-Agent 列入白名单或黑名单的方式来限制对服务或路由的访问
常见的场景是用来设置爬虫规则
allowlist 和 denylist 不可以同时启用
启用插件
1 2 3 4 5 6 7 8 9 10 11 12 13 14 15 16 17 18 19 20 $ curl http: { "uri" : "/index.html" , "upstream" : { "type" : "roundrobin" , "nodes" : { "web1:80" : 1 } } , "plugins" : { "ua-restriction" : { "bypass_missing" : true , "denylist" : [ "my-bot2" , "(Twitterspider)/(\\d+)\\.(\\d+)" ] , "message" : "Do you want to do something bad?" } } } '
测试插件
1 2 3 4 5 6 7 8 9 $ curl http: HTTP/1.1 200 OK Content-Type: text/html; charset=utf-8 Content-Length: 10 Connection: keep-alive Date: Fri, 05 Apr 2024 07 : 29 : 46 GMT Server: APISIX/3.9 .0 hello web1
1 2 3 4 5 6 7 8 9 $ curl -i http: HTTP/1.1 403 Forbidden Date: Fri, 05 Apr 2024 07 : 30 : 24 GMT Content-Type: text/html; charset=utf-8 Transfer-Encoding: chunked Connection: keep-alive Server: APISIX/3.9 .0 { "message" : "Do you want to do something bad?" }
referer-restriction
允许将 Referer 请求头中的域名列入白名单或黑名单来限制该域名对服务或路由的访问
whitelist 和 blacklist 属性无法同时在同一个服务或路由上使用,只能使用其中之一
启用插件
1 2 3 4 5 6 7 8 9 10 11 12 13 14 15 16 17 18 19 $ curl http: { "uri" : "/index.html" , "upstream" : { "type" : "roundrobin" , "nodes" : { "web1:80" : 1 } } , "plugins" : { "referer-restriction" : { "bypass_missing" : true , "whitelist" : [ "xx.com" , "*.xx.com" ] } } } '
测试插件
1 2 3 4 5 6 7 8 9 10 11 12 13 14 15 16 17 18 $ curl -v http: * Trying 127.0 .0 .1 : 9080. .. * Connected to 127.0 .0 .1 (127.0 .0 .1 ) port 9080 (#0 ) > GET /index.html HTTP/1.1 > Host: 127.0 .0 .1 : 9080 > User-Agent: curl/7.81 .0 > Accept: *
1 2 3 4 5 6 7 8 9 10 11 12 13 14 15 16 17 18 19 $ curl -v http: * Trying 127.0 .0 .1 : 9080. .. * Connected to 127.0 .0 .1 (127.0 .0 .1 ) port 9080 (#0 ) > GET /index.html HTTP/1.1 > Host: 127.0 .0 .1 : 9080 > User-Agent: curl/7.81 .0 > Accept: *
1 2 3 4 5 6 7 8 9 10 11 12 13 14 15 16 17 18 19 $ curl -v http: * Trying 127.0 .0 .1 : 9080. .. * Connected to 127.0 .0 .1 (127.0 .0 .1 ) port 9080 (#0 ) > GET /index.html HTTP/1.1 > Host: 127.0 .0 .1 : 9080 > User-Agent: curl/7.81 .0 > Accept: *
consumer-restriction
允许根据 Route、Service 或 Consumer 来设置相应的访问限制
consumer_name
创建 Consumer
1 2 3 4 5 6 7 8 9 10 11 12 13 14 15 16 17 18 19 20 21 $ curl http: { "username" : "jack1" , "plugins" : { "basic-auth" : { "username" : "jack2019" , "password" : "123456" } } } '$ curl http: { "username" : "jack2" , "plugins" : { "basic-auth" : { "username" : "jack2020" , "password" : "123456" } } } '
启用插件
1 2 3 4 5 6 7 8 9 10 11 12 13 14 15 16 17 18 $ curl http: { "uri" : "/index.html" , "upstream" : { "type" : "roundrobin" , "nodes" : { "web1:80" : 1 } } , "plugins" : { "basic-auth" : { } , "consumer-restriction" : { "whitelist" : [ "jack1" ] } } } '
验证插件
1 2 3 4 5 6 7 8 9 $ curl -u jack2019: 123456 http: HTTP/1.1 200 OK Content-Type: text/html; charset=utf-8 Content-Length: 10 Connection: keep-alive Date: Fri, 05 Apr 2024 07 : 40 : 49 GMT Server: APISIX/3.9 .0 hello web1
1 2 3 4 5 6 7 8 9 $ curl -u jack2020: 123456 http: HTTP/1.1 403 Forbidden Date: Fri, 05 Apr 2024 07 : 41 : 07 GMT Content-Type: text/html; charset=utf-8 Transfer-Encoding: chunked Connection: keep-alive Server: APISIX/3.9 .0 { "message" : "The consumer_name is forbidden." }
1 2 3 4 5 6 7 8 9 10 $ curl http: HTTP/1.1 401 Unauthorized Date: Fri, 05 Apr 2024 07 : 41 : 29 GMT Content-Type: text/html; charset=utf-8 Transfer-Encoding: chunked Connection: keep-alive WWW-Authenticate: Basic realm='.' Server: APISIX/3.9 .0 { "message" : "Missing authorization in request" }
allowed_by_methods
启用插件
1 2 3 4 5 6 7 8 9 10 11 12 13 14 15 16 17 18 19 $ curl http: { "uri" : "/index.html" , "upstream" : { "type" : "roundrobin" , "nodes" : { "web1:80" : 1 } } , "plugins" : { "basic-auth" : { } , "consumer-restriction" : { "allowed_by_methods" : [ { "user" : "jack1" , "methods" : [ "POST" ] } ] } } } '
验证插件
1 2 3 4 5 6 7 8 9 10 11 12 13 14 15 16 17 18 19 20 $ curl -v -u jack2019: 123456 http: * Trying 127.0 .0 .1 : 9080. .. * Connected to 127.0 .0 .1 (127.0 .0 .1 ) port 9080 (#0 ) * Server auth using Basic with user 'jack2019' > GET /index.html HTTP/1.1 > Host: 127.0 .0 .1 : 9080 > Authorization: Basic amFjazIwMTk6MTIzNDU2 > User-Agent: curl/7.81 .0 > Accept: *
1 2 3 4 5 6 7 8 9 10 11 12 13 14 15 16 17 18 19 20 $ curl -v -X POST -u jack2019: 123456 http: * Trying 127.0 .0 .1 : 9080. .. * Connected to 127.0 .0 .1 (127.0 .0 .1 ) port 9080 (#0 ) * Server auth using Basic with user 'jack2019' > POST /index.html HTTP/1.1 > Host: 127.0 .0 .1 : 9080 > Authorization: Basic amFjazIwMTk6MTIzNDU2 > User-Agent: curl/7.81 .0 > Accept: *
service_id
需要与 auth 插件一起使用
创建 Service
1 2 3 4 5 6 7 8 9 10 11 12 13 14 15 16 17 18 19 20 21 $ curl http: { "upstream" : { "nodes" : { "web1:80" : 1 } , "type" : "roundrobin" } , "desc" : "new service 001" } '$ curl http: { "upstream" : { "nodes" : { "web1:80" : 1 } , "type" : "roundrobin" } , "desc" : "new service 002" } '
创建 Consumer,配置 key-auth + consumer-restriction,限制 Consumer 对 Service 的访问
1 2 3 4 5 6 7 8 9 10 11 12 13 14 15 16 $ curl http: { "username" : "new_consumer" , "plugins" : { "key-auth" : { "key" : "auth-jack" } , "consumer-restriction" : { "type" : "service_id" , "whitelist" : [ "1" ] , "rejected_code" : 403 } } } '
在 Route 上启用 key-auth,并绑定 Service
1 2 3 4 5 6 7 8 9 $ curl http: { "uri" : "/index.html" , "service_id" : 1 , "plugins" : { "key-auth" : { } } } '
验证插件
1 2 3 4 5 6 7 8 9 $ curl http: HTTP/1.1 200 OK Content-Type: text/html; charset=utf-8 Content-Length: 10 Connection: keep-alive Date: Fri, 05 Apr 2024 07 : 50 : 42 GMT Server: APISIX/3.9 .0 hello web1
Route 绑定到另一个 Service
1 2 3 4 5 6 7 8 9 10 $ curl http: { "uri" : "/index.html" , "service_id" : 2 , "plugins" : { "key-auth" : { } } } '{ "key" : "/apisix/routes/1" , "value" : { "service_id" : 2 , "priority" : 0 , "update_time" : 1712303480 , "id" : "1" , "status" : 1 , "plugins" : { "key-auth" : { "header" : "apikey" , "query" : "apikey" , "hide_credentials" : false } } , "create_time" : 1712295917 , "uri" : "/index.html" } }
识别出 Consumer,但该 Consumer 只能访问 Service 1,而该路由绑定的是 Service 2,因此 Consumer 无法访问
1 2 3 4 5 6 7 8 9 $ curl http: HTTP/1.1 403 Forbidden Date: Fri, 05 Apr 2024 07 : 51 : 58 GMT Content-Type: text/html; charset=utf-8 Transfer-Encoding: chunked Connection: keep-alive Server: APISIX/3.9 .0 { "message" : "The service_id is forbidden." }
csrf
基于 Double Submit Cookie 的方式,保护用户的 API 免于 CSRF 攻击
GET、HEAD 和 OPTIONS 会被定义为 safe-methods(不会被检查拦截),其他的请求方法则定义为 unsafe-methods
每一个请求都会返回一个新的 Cookie
在后续对该路由进行的 unsafe-methods 请求中,需要从 Cookie 中读取加密的 Token,并在请求头中携带该 Token
启用插件 - 使用 GET 请求 /hello 时,在响应中会有一个携带了加密 Token 的 Cookie
1 2 3 4 5 6 7 8 9 10 11 12 13 14 15 $ curl -i http: { "uri" : "/hello" , "plugins" : { "csrf" : { "key" : "edd1c9f034335f136f87ad84b625c8f1" } } , "upstream" : { "type" : "roundrobin" , "nodes" : { "web1:80" : 1 } } } '
验证插件
1 2 3 4 5 6 7 8 9 10 $ curl -i http: HTTP/1.1 401 Unauthorized Date: Fri, 05 Apr 2024 08 : 16 : 37 GMT Content-Type: text/plain; charset=utf-8 Transfer-Encoding: chunked Connection: keep-alive Server: APISIX/3.9 .0 Set-Cookie: apisix-csrf-token=eyJyYW5kb20iOjAuMDEyOTQxMjMwNzUwMzY5LCJzaWduIjoiMTE3ZWIwYTU4MzExNjNmMDRkMjQ4ODkxYzg5NmY4YmZkZjRjYTJhMmQ3YjhhYmI0Y2FkYmFhY2U3OTg4MmRmMSIsImV4cGlyZXMiOjE3MTIzMDQ5OTd9;path=/;SameSite=Lax;Expires=Fri, 05 -Apr-24 10 : 16 : 37 GMT { "error_msg" : "no csrf token in headers" }
1 2 3 4 5 6 7 8 9 10 $ curl -i http: HTTP/1.1 200 OK Content-Type: text/plain; charset=utf-8 Content-Length: 10 Connection: keep-alive Date: Fri, 05 Apr 2024 08 : 17 : 11 GMT Server: APISIX/3.9 .0 Set-Cookie: apisix-csrf-token=eyJyYW5kb20iOjAuMTI3MDI4Mzk5Nzg5ODYsInNpZ24iOiI2ZWExOWJmY2I3OGVlZjVkZjhjZDBkYmI2YjFjODlkMTIzM2Q4MTQzMjEyOWU3ODU4NTEzM2EzNWMyZmJkNWIxIiwiZXhwaXJlcyI6MTcxMjMwNTAzMX0=;path=/;SameSite=Lax;Expires=Fri, 05 -Apr-24 10 : 17 : 11 GMT hello web1
在请求之前,用户需要从 Cookie 中读取 Token,并在后续的 unsafe-methods 请求的请求头中携带
1 2 3 4 5 6 7 8 9 10 $ curl -i http: HTTP/1.1 200 OK Content-Type: text/plain; charset=utf-8 Content-Length: 10 Connection: keep-alive Date: Fri, 05 Apr 2024 08 : 22 : 14 GMT Server: APISIX/3.9 .0 Set-Cookie: apisix-csrf-token=eyJzaWduIjoiZWM1NTU3YjIyNjU0ODE2YmIyNDlkNjE1YTU5NGEyYWE2MzJkNWQwMGU2NDhkMWQwZTViMzYxNTllNTNiMzkyNSIsInJhbmRvbSI6MC4xNzIzOTA1MjM4Njk0MiwiZXhwaXJlcyI6MTcxMjMwNTMzNH0=;path=/;SameSite=Lax;Expires=Fri, 05 -Apr-24 10 : 22 : 14 GMT hello web1
Traffic limit-req
使用漏桶算法限制单个客户端对服务的请求速率
启用插件
APISIX 将客户端的 IP 地址作为限制请求速率的条件
当请求速率小于 3 次每秒(rate)时,请求正常
当请求速率大于 3 次每秒(rate),小于 5 次每秒(rate + burst)时,将会对超出部分的请求进行延迟处理
当请求速率大于 5 次每秒(rate + burst)时,超出规定数量的请求将返回 HTTP 状态码 503
1 2 3 4 5 6 7 8 9 10 11 12 13 14 15 16 17 18 19 20 21 $ curl http: -H 'X-API-KEY: edd1c9f034335f136f87ad84b625c8f1' -X PUT -d ' { "methods" : [ "GET" ] , "uri" : "/index.html" , "plugins" : { "limit-req" : { "rate" : 3 , "burst" : 2 , "rejected_code" : 503 , "key_type" : "var" , "key" : "remote_addr" } } , "upstream" : { "type" : "roundrobin" , "nodes" : { "web1:80" : 1 } } } '
使用 var_combination
1 2 3 4 5 6 7 8 9 10 11 12 13 14 15 16 17 18 19 { "methods" : [ "GET" ] , "uri" : "/index.html" , "plugins" : { "limit-req" : { "rate" : 1 , "burst" : 2 , "rejected_code" : 503 , "key_type" : "var_combination" , "key" : "$consumer_name $remote_addr" } } , "upstream" : { "type" : "roundrobin" , "nodes" : { "web1:80" : 1 } } }
在 Consumer 上启用插件
1 2 3 4 5 6 7 8 9 10 11 12 13 14 15 16 $ curl http: -H 'X-API-KEY: edd1c9f034335f136f87ad84b625c8f1' -X PUT -d ' { "username" : "consumer_jack" , "plugins" : { "key-auth" : { "key" : "auth-jack" } , "limit-req" : { "rate" : 1 , "burst" : 1 , "rejected_code" : 403 , "key" : "consumer_name" } } } '
1 2 3 4 5 6 7 8 9 10 11 12 13 14 15 16 17 $ curl http: -H 'X-API-KEY: edd1c9f034335f136f87ad84b625c8f1' -X PUT -d ' { "methods" : [ "GET" ] , "uri" : "/index.html" , "plugins" : { "key-auth" : { "key" : "auth-jack" } } , "upstream" : { "type" : "roundrobin" , "nodes" : { "web1:80" : 1 } } } '
limit-conn
限制客户端对单个服务的并发请求数
启用插件
1 2 3 4 5 6 7 8 9 10 11 12 13 14 15 16 17 18 19 20 21 22 23 $ curl http: -H 'X-API-KEY: edd1c9f034335f136f87ad84b625c8f1' -X PUT -d ' { "methods" : [ "GET" ] , "uri" : "/index.html" , "id" : 1 , "plugins" : { "limit-conn" : { "conn" : 1 , "burst" : 0 , "default_conn_delay" : 0.1 , "rejected_code" : 503 , "key_type" : "var" , "key" : "remote_addr" } } , "upstream" : { "type" : "roundrobin" , "nodes" : { "web1:80" : 1 } } } '
limit-count
使用固定时间窗口算法,主要用于限制单个客户端在指定的时间范围内对服务的总请求数,并且会在 HTTP 响应头中返回剩余可以请求的个数
同一个 group 里面的 limit-count 的配置必须保持一致。如果修改配置,需要同时更新对应的 group 的值
启用插件
1 2 3 4 5 6 7 8 9 10 11 12 13 14 15 16 17 18 19 20 $ curl -i http: -H 'X-API-KEY: edd1c9f034335f136f87ad84b625c8f1' -X PUT -d ' { "uri" : "/index.html" , "plugins" : { "limit-count" : { "count" : 2 , "time_window" : 60 , "rejected_code" : 503 , "key_type" : "var" , "key" : "remote_addr" } } , "upstream" : { "type" : "roundrobin" , "nodes" : { "web1:80" : 1 } } } '
可以在多个 Route 之间共享同一个限流计数器
创建 Service
1 2 3 4 5 6 7 8 9 10 11 12 13 14 15 16 17 18 19 $ curl -i http: -H 'X-API-KEY: edd1c9f034335f136f87ad84b625c8f1' -X PUT -d ' { "plugins" : { "limit-count" : { "count" : 1 , "time_window" : 60 , "rejected_code" : 503 , "key" : "remote_addr" , "group" : "services_1#1640140620" } } , "upstream" : { "type" : "roundrobin" , "nodes" : { "web1:80" : 1 } } } '
创建多个 Route,并引用同一个 Service,将共享同一个限流计数器
1 2 3 4 5 6 7 8 9 10 11 12 13 $ curl -i http: -H 'X-API-KEY: edd1c9f034335f136f87ad84b625c8f1' -X PUT -d ' { "service_id" : "1" , "uri" : "/hello" } '$ curl -i http: -H 'X-API-KEY: edd1c9f034335f136f87ad84b625c8f1' -X PUT -d ' { "service_id" : "1" , "uri" : "/hello2" } '
将 key_type 设置为 constant,也可以在所有请求间共享同一个限流计数器
当多个 Route 中的 limit-count.group = services_1#1640140621 时,访问这些 Route 的请求将共享同一个限流计数器
1 2 3 4 5 6 7 8 9 10 11 12 13 14 15 16 17 18 19 20 $ curl -i http: -H 'X-API-KEY: edd1c9f034335f136f87ad84b625c8f1' -X PUT -d ' { "plugins" : { "limit-count" : { "count" : 1 , "time_window" : 60 , "rejected_code" : 503 , "key" : "remote_addr" , "key_type" : "constant" , "group" : "services_1#1640140621" } } , "upstream" : { "type" : "roundrobin" , "nodes" : { "web1:80" : 1 } } } '
测试插件
1 2 3 4 5 6 7 8 9 10 $ curl -i http: HTTP/1.1 200 OK Content-Type: text/html; charset=utf-8 Content-Length: 10 Connection: keep-alive X-RateLimit-Limit: 2 X-RateLimit-Remaining: 1 X-RateLimit-Reset: 60 Date: Fri, 05 Apr 2024 09 : 11 : 08 GMT Server: APISIX/3.9 .0
1 2 3 4 5 6 7 8 9 10 $ curl -i http://127.0.0.1:9080/index.html HTTP/1.1 200 OK Content-Type: text/html; charset=utf-8 Content-Length: 10 Connection: keep-alive X-RateLimit-Limit: 2 X-RateLimit-Remaining: 0 X-RateLimit-Reset: 55 Date: Fri, 05 Apr 2024 09:11:13 GMT Server: APISIX/3.9.0
1 2 3 4 5 6 7 8 9 10 $ curl -i http://127.0.0.1:9080/index.html HTTP/1.1 503 Service Temporarily Unavailable Date: Fri, 05 Apr 2024 09:11:14 GMT Content-Type: text/html; charset=utf-8 Content-Length: 269 Connection: keep-alive X-RateLimit-Limit: 2 X-RateLimit-Remaining: 0 X-RateLimit-Reset: 50 Server: APISIX/3.9.0
proxy-cache
提供缓存后端响应数据的能力
支持基于磁盘和内存的缓存
可以根据响应码和请求模式来指定需要缓存的数据,也可以通过 no_cache 和 cache_bypass 属性配置更复杂的缓存策略
对于基于磁盘的缓存,不能动态配置缓存的过期时间
只能通过后端服务响应头 Expires 或 Cache-Control 来设置过期时间
当后端响应头中没有 Expires 或 Cache-Control 时,默认缓存时间为 10 秒钟
当上游服务不可用时,APISIX 将返回 502 或 504 HTTP 状态码,默认缓存时间为 10 秒钟
disk
启用插件
1 2 3 4 5 6 7 8 9 10 11 12 13 14 15 16 17 18 19 20 21 $ curl http: -H 'X-API-KEY: edd1c9f034335f136f87ad84b625c8f1' -X PUT -d ' { "uri" : "/ip" , "plugins" : { "proxy-cache" : { "cache_key" : [ "$uri" , "-cache-id" ] , "cache_bypass" : [ "$arg_bypass" ] , "cache_method" : [ "GET" ] , "cache_http_status" : [ 200 ] , "hide_cache_headers" : true , "no_cache" : [ "$arg_test" ] } } , "upstream" : { "nodes" : { "httpbin.org" : 1 } , "type" : "roundrobin" } } '
memory 1 2 3 4 5 6 7 8 9 10 11 12 13 14 15 16 17 18 $ curl http: -H 'X-API-KEY: edd1c9f034335f136f87ad84b625c8f1' -X PUT -d ' { "uri" : "/ip" , "plugins" : { "proxy-cache" : { "cache_strategy" : "memory" , "cache_zone" : "memory_cache" , "cache_ttl" : 10 } } , "upstream" : { "nodes" : { "httpbin.org" : 1 } , "type" : "roundrobin" } } '
测试插件
首次未命中
1 2 3 4 5 6 7 8 9 10 11 12 13 14 $ curl http: HTTP/1.1 200 OK Content-Type: application/json Content-Length: 46 Connection: keep-alive Apisix-Cache-Status: MISS Date: Fri, 05 Apr 2024 09 : 23 : 01 GMT Access-Control-Allow-Origin: * Access-Control-Allow-Credentials: true Server: APISIX/3.9 .0 { "origin" : "172.18.0.1, 129.227.149.219" }
过期
1 2 3 4 5 6 7 8 9 10 11 12 13 14 $ curl http: HTTP/1.1 200 OK Content-Type: application/json Content-Length: 46 Connection: keep-alive Apisix-Cache-Status: EXPIRED Date: Fri, 05 Apr 2024 09 : 23 : 24 GMT Access-Control-Allow-Origin: * Access-Control-Allow-Credentials: true Server: APISIX/3.9 .0 { "origin" : "172.18.0.1, 129.227.149.219" }
命中
1 2 3 4 5 6 7 8 9 10 11 12 13 14 15 $ curl http: HTTP/1.1 200 OK Content-Type: application/json Transfer-Encoding: chunked Connection: keep-alive Access-Control-Allow-Origin: * Server: APISIX/3.9 .0 Date: Fri, 05 Apr 2024 09 : 23 : 48 GMT Access-Control-Allow-Credentials: true Age: 1 Apisix-Cache-Status: HIT { "origin" : "172.18.0.1, 129.227.149.219" }
清除缓存数据 - PURGE
1 2 3 4 5 6 7 $ curl -i http: HTTP/1.1 200 OK Date: Fri, 05 Apr 2024 09 : 25 : 24 GMT Content-Type: text/plain; charset=utf-8 Transfer-Encoding: chunked Connection: keep-alive Server: APISIX/3.9 .0
1 2 3 4 5 6 7 8 9 10 11 12 13 14 $ curl http: HTTP/1.1 200 OK Content-Type: application/json Content-Length: 46 Connection: keep-alive Apisix-Cache-Status: MISS Date: Fri, 05 Apr 2024 09 : 25 : 29 GMT Access-Control-Allow-Origin: * Access-Control-Allow-Credentials: true Server: APISIX/3.9 .0 { "origin" : "172.18.0.1, 129.227.149.219" }
request-validation
提前验证向上游服务转发的请求使用 JSON Schema 机制进行数据验证,可以验证请求的 body 及 header 数据
至少需要配置 header_schema 和 body_schema 属性中的任意一个,两者也可以同时使用
Enum
1 2 3 4 5 6 7 8 9 10 11 12 13 { "body_schema" : { "type" : "object" , "required" : [ "enum_payload" ] , "properties" : { "enum_payload" : { "type" : "string" , "enum" : [ "enum_string_1" , "enum_string_2" ] , "default" : "enum_string_1" } } } }
Boolean
1 2 3 4 5 6 7 8 9 10 11 12 { "body_schema" : { "type" : "object" , "required" : [ "bool_payload" ] , "properties" : { "bool_payload" : { "type" : "boolean" , "default" : true } } } }
数字范围
1 2 3 4 5 6 7 8 9 10 11 12 13 { "body_schema" : { "type" : "object" , "required" : [ "integer_payload" ] , "properties" : { "integer_payload" : { "type" : "integer" , "minimum" : 1 , "maximum" : 65535 } } } }
String
1 2 3 4 5 6 7 8 9 10 11 12 13 { "body_schema" : { "type" : "object" , "required" : [ "string_payload" ] , "properties" : { "string_payload" : { "type" : "string" , "minLength" : 1 , "maxLength" : 32 } } } }
Regex
1 2 3 4 5 6 7 8 9 10 11 12 13 14 { "body_schema" : { "type" : "object" , "required" : [ "regex_payload" ] , "properties" : { "regex_payload" : { "type" : "string" , "minLength" : 1 , "maxLength" : 32 , "pattern" : "[[^[a-zA-Z0-9_]+$]]" } } } }
Array
1 2 3 4 5 6 7 8 9 10 11 12 13 14 15 16 17 18 19 { "body_schema" : { "type" : "object" , "required" : [ "array_payload" ] , "properties" : { "array_payload" : { "type" : "array" , "minItems" : 1 , "items" : { "type" : "integer" , "minimum" : 200 , "maximum" : 599 } , "uniqueItems" : true , "default" : [ 200 , 302 ] } } } }
Combined
1 2 3 4 5 6 7 8 9 10 11 12 13 14 15 16 17 18 19 20 21 22 23 24 25 26 27 28 { "body_schema" : { "type" : "object" , "required" : [ "boolean_payload" , "array_payload" , "regex_payload" ] , "properties" : { "boolean_payload" : { "type" : "boolean" } , "array_payload" : { "type" : "array" , "minItems" : 1 , "items" : { "type" : "integer" , "minimum" : 200 , "maximum" : 599 } , "uniqueItems" : true , "default" : [ 200 , 302 ] } , "regex_payload" : { "type" : "string" , "minLength" : 1 , "maxLength" : 32 , "pattern" : "[[^[a-zA-Z0-9_]+$]]" } } } }
启用插件
1 2 3 4 5 6 7 8 9 10 11 12 13 14 15 16 17 18 19 20 21 22 23 24 $ curl http: -H 'X-API-KEY: edd1c9f034335f136f87ad84b625c8f1' -X PUT -d ' { "uri" : "/get" , "plugins" : { "request-validation" : { "body_schema" : { "type" : "object" , "required" : [ "required_payload" ] , "properties" : { "required_payload" : { "type" : "string" } , "boolean_payload" : { "type" : "boolean" } } } , "rejected_msg" : "customize reject message" } } , "upstream" : { "type" : "roundrobin" , "nodes" : { "web1:80" : 1 } } } '
测试插件
1 2 3 4 5 6 7 8 9 10 11 12 $ curl -i --header "Content-Type: application/json" \ --request POST \ --data '{ "boolean-payload" : true , "required_payload" : "hello" } ' \ http: HTTP/1.1 200 OK Content-Type: text/plain; charset=utf-8 Content-Length: 10 Connection: keep-alive Date: Fri, 05 Apr 2024 09 : 33 : 26 GMT Server: APISIX/3.9 .0 hello web1
proxy-mirror
提供了镜像客户端请求的能力
将线上真实流量拷贝到镜像服务中,以便在不影响线上服务的情况下,对线上流量或请求内容进行具体的分析
镜像请求返回的响应会被忽略
镜像请求是以子请求的方式实现,子请求的延迟将会导致原始请求阻塞,直到子请求完成,才可以恢复正常
启动镜像服务
1 2 $ python3 -m http.server 9797 Serving HTTP on 0.0 .0 .0 port 9797 (http://0.0 .0 .0 :9797 /) ...
启用插件
1 2 3 4 5 6 7 8 9 10 11 12 13 14 15 16 $ curl http: -H 'X-API-KEY: edd1c9f034335f136f87ad84b625c8f1' -X PUT -d ' { "plugins" : { "proxy-mirror" : { "host" : "http://127.0.0.1:9797" } } , "upstream" : { "nodes" : { "web1:80" : 1 } , "type" : "roundrobin" } , "uri" : "/hello" } '
api-breaker
实现了 API 熔断功能
熔断超时 - 自动按触发不健康状态的次数递增运算
当上游服务返回 unhealthy.http_statuses 配置中的状态码(默认为 500),并达到 unhealthy.failures 预设次数时(默认为 3 次),则认为上游服务处于不健康状态
指数退让
第一次触发不健康状态时,熔断 2 秒
超过熔断时间后,将重新开始转发请求到上游服务,如果继续返回 unhealthy.http_statuses 状态码,记数再次达到 unhealthy.failures 预设次数时,熔断 4 秒
依次类推(2,4,8,16,……),直到达到预设的 max_breaker_sec 值
当上游服务处于不健康状态时,如果转发请求到上游服务并返回 healthy.http_statuses 配置中的状态码(默认为 200),并达到 healthy.successes 次时,则认为上游服务恢复至健康状态
启用插件
1 2 3 4 5 6 7 8 9 10 11 12 13 14 15 16 17 18 19 20 21 22 23 24 $ curl "http://127.0.0.1:9180/apisix/admin/routes/1" \ -H 'X-API-KEY: edd1c9f034335f136f87ad84b625c8f1' -X PUT -d ' { "plugins" : { "api-breaker" : { "break_response_code" : 502 , "unhealthy" : { "http_statuses" : [ 500 , 503 ] , "failures" : 3 } , "healthy" : { "http_statuses" : [ 200 ] , "successes" : 1 } } } , "upstream" : { "type" : "roundrobin" , "nodes" : { "127.0.0.1:1980" : 1 } } , "uri" : "/hello" } '
traffic-split
通过配置 match 和 weighted_upstreams 属性,从而动态地将部分流量引导至各种上游服务
可应用于灰度发布和蓝绿发布的场景
match 属性是用于引导流量的自定义规则,而 weighted_upstreams 属性则用于引导流量的上游服务
当一个请求被 match 属性匹配时,它将根据配置的 weights 属性被引导至上游服务
也可以不使用 match 属性,只根据 weighted_upstreams 属性来引导所有流量
使用了加权循环算法(特别是在重置 wrr 状态时),因此在使用该插件时,可能会存在上游服务之间的流量比例不精准现象
在 match 属性中,变量中的表达式以 AND 方式关联,多个变量以 OR 方式关联
如果仅配置了 weight 属性,那么它将会使用该 Route 或 Service 中的上游服务的权重。
启用插件
1 2 3 4 5 6 7 8 9 10 11 12 13 14 15 16 17 18 19 20 21 22 23 24 25 26 27 28 29 30 31 32 33 34 35 36 37 38 39 $ curl http: -H 'X-API-KEY: edd1c9f034335f136f87ad84b625c8f1' -X PUT -d ' { "uri" : "/index.html" , "plugins" : { "traffic-split" : { "rules" : [ { "weighted_upstreams" : [ { "upstream" : { "name" : "upstream_A" , "type" : "roundrobin" , "nodes" : { "127.0.0.1:1981" : 10 } , "timeout" : { "connect" : 15 , "send" : 15 , "read" : 15 } } , "weight" : 1 } , { "weight" : 1 } ] } ] } } , "upstream" : { "type" : "roundrobin" , "nodes" : { "127.0.0.1:1980" : 1 } } } '
通过 upstream_id 来引用 - weighted_upstreams 属性支持同时使用 upstream 和 upstream_id 两种配置方式
1 2 3 4 5 6 7 8 9 10 11 12 13 14 15 16 17 18 19 20 21 22 23 24 25 26 27 28 $ curl http: -H 'X-API-KEY: edd1c9f034335f136f87ad84b625c8f1' -X PUT -d ' { "uri" : "/index.html" , "plugins" : { "traffic-split" : { "rules" : [ { "weighted_upstreams" : [ { "upstream_id" : 1 , "weight" : 1 } , { "weight" : 1 } ] } ] } } , "upstream" : { "type" : "roundrobin" , "nodes" : { "127.0.0.1:1980" : 1 } } } '
灰度发布
60% 的流量 -> 1981 端口,40% 的流量 -> 1980 端口
1 2 3 4 5 6 7 8 9 10 11 12 13 14 15 16 17 18 19 20 21 22 23 24 25 26 27 28 29 30 31 32 33 34 35 36 37 38 39 $ curl http: -H 'X-API-KEY: edd1c9f034335f136f87ad84b625c8f1' -X PUT -d ' { "uri" : "/index.html" , "plugins" : { "traffic-split" : { "rules" : [ { "weighted_upstreams" : [ { "upstream" : { "name" : "upstream_A" , "type" : "roundrobin" , "nodes" : { "127.0.0.1:1981" : 10 } , "timeout" : { "connect" : 15 , "send" : 15 , "read" : 15 } } , "weight" : 3 } , { "weight" : 2 } ] } ] } } , "upstream" : { "type" : "roundrobin" , "nodes" : { "127.0.0.1:1980" : 1 } } } '
蓝绿发布 1 2 3 4 5 6 7 8 9 10 11 12 13 14 15 16 17 18 19 20 21 22 23 24 25 26 27 28 29 30 31 32 33 34 35 36 37 $ curl http: -H 'X-API-KEY: edd1c9f034335f136f87ad84b625c8f1' -X PUT -d ' { "uri" : "/index.html" , "plugins" : { "traffic-split" : { "rules" : [ { "match" : [ { "vars" : [ [ "http_release" , "==" , "new_release" ] ] } ] , "weighted_upstreams" : [ { "upstream" : { "name" : "upstream_A" , "type" : "roundrobin" , "nodes" : { "web2:80" : 10 } } } ] } ] } } , "upstream" : { "type" : "roundrobin" , "nodes" : { "web1:80" : 1 } } } '
验证插件
1 2 3 4 5 6 7 8 9 $ curl http: HTTP/1.1 200 OK Content-Type: text/html; charset=utf-8 Content-Length: 10 Connection: keep-alive Date: Fri, 05 Apr 2024 10 : 14 : 32 GMT Server: APISIX/3.9 .0 hello web2
1 2 3 4 5 6 7 8 9 $ curl http: HTTP/1.1 200 OK Content-Type: text/html; charset=utf-8 Content-Length: 10 Connection: keep-alive Date: Fri, 05 Apr 2024 10 : 15 : 04 GMT Server: APISIX/3.9 .0 hello web1
自定义发布
单个 vars 规则
在 match 规则校验通过后,将会有 60% 的请求被引导至插件 1981 端口的上游服务,40% 的请求被引导至路由 1980 端口的上游服务
如果 match 规则校验失败(如缺少请求头 apisix-key), 那么请求将被引导至路由的 1980 端口的上游服务
1 2 3 4 5 6 7 8 9 10 11 12 13 14 15 16 17 18 19 20 21 22 23 24 25 26 27 28 29 30 31 32 33 34 35 36 37 38 39 40 41 42 43 $ curl http: -H 'X-API-KEY: edd1c9f034335f136f87ad84b625c8f1' -X PUT -d ' { "uri" : "/index.html" , "plugins" : { "traffic-split" : { "rules" : [ { "match" : [ { "vars" : [ [ "arg_name" , "==" , "jack" ] , [ "http_user-id" , ">" , "23" ] , [ "http_apisix-key" , "~~" , "[a-z]+" ] ] } ] , "weighted_upstreams" : [ { "upstream" : { "name" : "upstream_A" , "type" : "roundrobin" , "nodes" : { "127.0.0.1:1981" : 10 } } , "weight" : 3 } , { "weight" : 2 } ] } ] } } , "upstream" : { "type" : "roundrobin" , "nodes" : { "127.0.0.1:1980" : 1 } } } '
多个 vars 规则
如果两个 vars 表达式均匹配成功,match 规则校验通过后
将会有 60% 的请求被引导至插件 1981 端口的上游服务,40% 的请求命中到路由的 1980 端口的上游服务
如果第二个 vars 的表达式匹配失败(例如缺少 name2 请求参数),match 规则校验通过后,效果将会与上一种相同
即有 60% 的请求被引导至插件 1981 端口的上游服务,40% 的请求命中到路由的 1980 端口的上游服务
如果两个 vars 的表达式均匹配失败(如缺少 name 和 name2 请求参数),match 规则会校验失败,请求将被引导至路由的 1980 端口的上游服务
1 2 3 4 5 6 7 8 9 10 11 12 13 14 15 16 17 18 19 20 21 22 23 24 25 26 27 28 29 30 31 32 33 34 35 36 37 38 39 40 41 42 43 44 45 46 47 48 49 50 $ curl http: -H 'X-API-KEY: edd1c9f034335f136f87ad84b625c8f1' -X PUT -d ' { "uri" : "/index.html" , "plugins" : { "traffic-split" : { "rules" : [ { "match" : [ { "vars" : [ [ "arg_name" , "==" , "jack" ] , [ "http_user-id" , ">" , "23" ] , [ "http_apisix-key" , "~~" , "[a-z]+" ] ] } , { "vars" : [ [ "arg_name2" , "==" , "rose" ] , [ "http_user-id2" , "!" , ">" , "33" ] , [ "http_apisix-key2" , "~~" , "[a-z]+" ] ] } ] , "weighted_upstreams" : [ { "upstream" : { "name" : "upstream_A" , "type" : "roundrobin" , "nodes" : { "127.0.0.1:1981" : 10 } } , "weight" : 3 } , { "weight" : 2 } ] } ] } } , "upstream" : { "type" : "roundrobin" , "nodes" : { "127.0.0.1:1980" : 1 } } } '
匹配规则与上游对应
配置多个 rules 属性,实现不同的匹配规则与上游一一对应
当请求头 x-api-id 为 1 时,请求会被引导至 1981 端口的上游服务
当 x-api-id 为 2 时,请求会被引导至 1982 端口的上游服务
否则请求会被引导至 1980 端口的上游服务
1 2 3 4 5 6 7 8 9 10 11 12 13 14 15 16 17 18 19 20 21 22 23 24 25 26 27 28 29 30 31 32 33 34 35 36 37 38 39 40 41 42 43 44 45 46 47 48 49 50 51 52 53 54 55 56 57 58 59 $ curl http: -H 'X-API-KEY: edd1c9f034335f136f87ad84b625c8f1' -X PUT -d ' { "uri" : "/hello" , "plugins" : { "traffic-split" : { "rules" : [ { "match" : [ { "vars" : [ [ "http_x-api-id" , "==" , "1" ] ] } ] , "weighted_upstreams" : [ { "upstream" : { "name" : "upstream-A" , "type" : "roundrobin" , "nodes" : { "127.0.0.1:1981" : 1 } } , "weight" : 3 } ] } , { "match" : [ { "vars" : [ [ "http_x-api-id" , "==" , "2" ] ] } ] , "weighted_upstreams" : [ { "upstream" : { "name" : "upstream-B" , "type" : "roundrobin" , "nodes" : { "127.0.0.1:1982" : 1 } } , "weight" : 3 } ] } ] } } , "upstream" : { "type" : "roundrobin" , "nodes" : { "127.0.0.1:1980" : 1 } } } '
request-id
为每一个请求代理添加 unique ID 用于追踪 API 请求
如果请求已经配置了 header_name 属性的请求头,该插件将不会为请求添加 unique ID - 不会覆盖
启用插件
1 2 3 4 5 6 7 8 9 10 11 12 13 14 15 16 $ curl http: -H 'X-API-KEY: edd1c9f034335f136f87ad84b625c8f1' -X PUT -d ' { "uri" : "/hello" , "plugins" : { "request-id" : { "include_in_response" : true } } , "upstream" : { "type" : "roundrobin" , "nodes" : { "web1:80" : 1 } } } '
验证插件
1 2 3 4 5 6 7 8 9 10 $ curl -i http: HTTP/1.1 200 OK Content-Type: text/plain; charset=utf-8 Content-Length: 10 Connection: keep-alive Date: Fri, 05 Apr 2024 10 : 28 : 37 GMT Server: APISIX/3.9 .0 X-Request-Id: 838 b088d-65 ab-4895 -a03e-11656 f671333 hello web1
proxy-control
动态地控制 NGINX 代理的相关行为
需要 APISIX 在 APISIX-Runtime 环境上运行
client-control
通过设置客户端请求体大小的上限来动态地控制 NGINX 处理客户端的请求
需要 APISIX 在 APISIX-Runtime 环境上运行
启用插件
1 2 3 4 5 6 7 8 9 10 11 12 13 14 15 16 $ curl -i http: -H 'X-API-KEY: edd1c9f034335f136f87ad84b625c8f1' -X PUT -d ' { "uri" : "/index.html" , "plugins" : { "client-control" : { "max_body_size" : 1 } } , "upstream" : { "type" : "roundrobin" , "nodes" : { "127.0.0.1:1980" : 1 } } } '
验证插件
1 2 3 4 5 6 7 8 9 10 11 12 13 14 15 $ curl -i http: HTTP/1.1 413 Request Entity Too Large Date: Fri, 05 Apr 2024 10 : 32 : 58 GMT Content-Type: text/html; charset=utf-8 Content-Length: 255 Connection: close Server: APISIX/3.9 .0 <html> <head><title>413 Request Entity Too Large</title></head> <body> <center><h1>413 Request Entity Too Large</h1></center> <hr><center>openresty</center> <p><em>Powered by <a href="https://apisix.apache.org/" >APISIX</a>.</em></p></body> </html>
workflow
引入 lua-resty-expr 来提供复杂的流量控制功能
actions 中只支持一个元素
在 rules 中,按照 rules 的数组下标顺序依次匹配 case,如果 case 匹配成功,则直接执行对应的 actions
启用插件
1 2 3 4 5 6 7 8 9 10 11 12 13 14 15 16 17 18 19 20 21 22 23 24 25 26 27 28 29 30 31 32 33 34 35 36 37 38 39 40 41 42 43 $ curl http: -H 'X-API-KEY: edd1c9f034335f136f87ad84b625c8f1' -X PUT -d ' { "uri" : "/hello/*" , "plugins" : { "workflow" : { "rules" : [ { "case" : [ [ "uri" , "==" , "/hello/rejected" ] ] , "actions" : [ [ "return" , { "code" : 403 } ] ] } , { "case" : [ [ "uri" , "==" , "/hello/v2/appid" ] ] , "actions" : [ [ "limit-count" , { "count" : 2 , "time_window" : 60 , "rejected_code" : 429 } ] ] } ] } } , "upstream" : { "type" : "roundrobin" , "nodes" : { "web1:80" : 1 } } } '
测试插件
1 2 3 4 5 6 7 8 9 $ curl http: HTTP/1.1 403 Forbidden Date: Fri, 05 Apr 2024 10 : 37 : 49 GMT Content-Type: text/plain; charset=utf-8 Transfer-Encoding: chunked Connection: keep-alive Server: APISIX/3.9 .0 { "error_msg" : "rejected by workflow" }
1 2 3 4 5 6 7 8 9 10 11 12 13 14 15 16 17 18 19 20 21 22 23 24 25 26 27 28 29 30 31 32 33 34 35 36 37 38 39 40 41 42 43 44 $ curl http: HTTP/1.1 200 OK Content-Type: text/plain; charset=utf-8 Content-Length: 10 Connection: keep-alive X-RateLimit-Limit: 2 X-RateLimit-Remaining: 1 X-RateLimit-Reset: 60 Date: Fri, 05 Apr 2024 10 : 38 : 12 GMT Server: APISIX/3.9 .0 hello web1 $ curl http: HTTP/1.1 200 OK Content-Type: text/plain; charset=utf-8 Content-Length: 10 Connection: keep-alive X-RateLimit-Limit: 2 X-RateLimit-Remaining: 0 X-RateLimit-Reset: 59 Date: Fri, 05 Apr 2024 10 : 38 : 18 GMT Server: APISIX/3.9 .0 hello web1 $ curl http: HTTP/1.1 429 Too Many Requests Date: Fri, 05 Apr 2024 10 : 38 : 19 GMT Content-Type: text/html; charset=utf-8 Content-Length: 241 Connection: keep-alive X-RateLimit-Limit: 2 X-RateLimit-Remaining: 0 X-RateLimit-Reset: 53 Server: APISIX/3.9 .0 <html> <head><title>429 Too Many Requests</title></head> <body> <center><h1>429 Too Many Requests</h1></center> <hr><center>openresty</center> <p><em>Powered by <a href="https://apisix.apache.org/" >APISIX</a>.</em></p></body> </html>
1 2 3 4 5 6 7 8 9 $ curl http: HTTP/1.1 200 OK Content-Type: text/plain; charset=utf-8 Content-Length: 10 Connection: keep-alive Date: Fri, 05 Apr 2024 10 : 39 : 40 GMT Server: APISIX/3.9 .0 hello web1
Development external-plugin
APISIX 支持使用 Lua 语言编写插件,这种类型的插件在 APISIX 内部执行
APISIX 支持以 Sidecar 的方式加载和运行其它语言开发的插件 - External Plugin
工作原理
在 APISIX 中配置了一个 Plugin Runner,APISIX 将以子进程的方式运行该 Plugin Runner
该子进程与 APISIX 进程从属相同用户
当重启或者重新加载 APISIX 时,该 Plugin Runner 也将被重启
一旦为指定 Route 配置了 ext-plugin-* 插件
匹配该 Route 的请求将触发从 APISIX 到 Plugin Runner 的 RPC 调用
Plugin Runner 将处理该 RPC 调用,在其侧创建一个请求,运行 External Plugin 并将结果返回给 APISIX
External Plugin 及其执行顺序在这里 ext-plugin-* 配置
External Plugin 可以动态启用和重新配置
默认情况下,Nginx 将隐藏所有环境变量,APISIX 不会将环境变量传递给 Plugin Runner
先发送 SIGTERM 给 Plugin Runner,1 秒后,如果 Plugin Runner 仍然在运行,发送 SIGKILL
Discovery
微服务 + 注册中心
网关会准实时地从注册中心获取服务实例信息
当用户通过网关请求服务时,网关从注册中心获取的实例列表中选择一个进行代理
Eureka 1 2 3 4 5 6 7 8 9 10 11 12 13 14 15 16 17 18 19 20 21 22 23 24 25 26 27 28 29 30 31 32 33 34 35 { "applications" : { "application" : [ { "name" : "USER-SERVICE" , # 服务名称 "instance" : [ { "instanceId" : "192.168.1.100:8761" , "hostName" : "192.168.1.100" , "app" : "USER-SERVICE" , # 服务名称 "ipAddr" : "192.168.1.100" , # 实例 IP 地址 "status" : "UP" , # 状态 "overriddenStatus" : "UNKNOWN" , # 覆盖状态 "port" : { "$" : 8761 , # 端口 "@enabled" : "true" # 开始端口 } , "securePort" : { "$" : 443 , "@enabled" : "false" } , "metadata" : { "management.port" : "8761" , "weight" : 100 # 权重,需要通过 spring boot 应用的 eureka.instance.metadata-map.weight 进行配置 } , "homePageUrl" : "http://192.168.1.100:8761/" , "statusPageUrl" : "http://192.168.1.100:8761/actuator/info" , "healthCheckUrl" : "http://192.168.1.100:8761/actuator/health" , ... ... } ] } ] } }
首先要选择状态为“UP”的实例:overriddenStatus 值不为 “UNKNOWN” 以 overriddenStatus 为准,否则以 status 的值为准
IP 地址:以 ipAddr 的值为 IP; 并且必须是 IPv4 或 IPv6 格式的
端口
如果 port[“@enabled”] 等于 “true” 那么使用 port[“$“] 的值
如果 securePort[“@enabled”] 等于 “true” 那么使用 securePort[“$”] 的值
权重
先判断 metadata.weight 是否有值,如果没有,则取配置中的 eureka.weight 的值,如果还没有,则取默认值100
1 2 3 4 5 6 7 8 9 10 11 12 discovery: eureka: host: - "http://${username}:${password}@${eureka_host1}:${eureka_port1}" - "http://${username}:${password}@${eureka_host2}:${eureka_port2}" prefix: "/eureka/" fetch_interval: 30 weight: 100 timeout: connect: 2000 send: 2000 read: 5000
Upstream - L7 - (通过 upstream.discovery_type 选择使用的服务发现,upstream.service_name 与注册中心的服务名进行关联)
1 2 3 4 5 6 7 8 9 $ curl http: { "uri" : "/user/*" , "upstream" : { "service_name" : "USER-SERVICE" , "type" : "roundrobin" , "discovery_type" : "eureka" } } '
1 2 3 4 5 6 7 8 9 10 11 12 13 14 15 16 17 18 19 20 21 22 23 24 25 26 27 28 29 $ curl http: { "uri" : "/a/*" , "plugins" : { "proxy-rewrite" : { "regex_uri" : [ "^/a/(.*)" , "/${1}" ] } } , "upstream" : { "service_name" : "A-SERVICE" , "type" : "roundrobin" , "discovery_type" : "eureka" } } '$ curl http: { "uri" : "/b/*" , "plugins" : { "proxy-rewrite" : { "regex_uri" : [ "^/b/(.*)" , "/${1}" ] } } , "upstream" : { "service_name" : "B-SERVICE" , "type" : "roundrobin" , "discovery_type" : "eureka" } } '
配置 upstream.service_name 后upstream.nodes 将不再生效,而是使用从注册中心的数据来替换,即使注册中心的数据是空的
Control Plane
目前已经支持了 ZooKeeper 和 Nacos
通过 Admin API 向 APISIX 注册上游并指定服务发现类型
APISIX-Seed 将监听 etcd 中的 APISIX 资源变化,过滤服务发现类型并获取服务名称(如 ZooKeeper)
APISIX-Seed 将在服务注册中心(如 ZooKeeper)订阅指定的服务名称,以监控和更新对应的服务信息
客户端向服务注册中心注册服务后,APISIX-Seed 会获取新的服务信息,并将更新后的服务节点写入 etcd
当 APISIX-Seed 在 etcd 中更新相应的服务节点信息时,APISIX 会将最新的服务节点信息同步到内存中
优势
网络拓扑变得更简单
APISIX 不需要与每个注册中心保持网络连接,只需要关注 etcd 中的配置信息即可
上游服务总数据量变小
由于 registry 的特性,APISIX 可能会在 Worker 中存储全量的 registry 服务数据
过引入 APISIX-Seed,APISIX 的每个进程将不需要额外缓存上游服务相关信息
更容易管理
服务发现配置需要为每个 APISIX 实例配置一次
通过引入 APISIX-Seed,APISIX 将对服务注册中心的配置变化无感知
Kubernetes
以 List-Watch 方式监听 Kubernetes 集群 Endpoints 资源的实时变化,并将其值存储到 ngx.shared.DICT 中
支持单集群和多集群模式,分别适用于待发现的服务分布在单个或多个 Kubernetes 的场景
PubSub
RadixTree
匹配优先级:完全匹配 -> 深度前缀匹配
不同的路由具有相同 uri
通过设置路由的 priority 字段来决定先匹配哪条路由,或者添加其他匹配规则来区分不同的路由
在匹配规则中, priority 字段优先于除 uri 之外的其他规则
radixtree_uri_with_parameter - 可以用参数匹配路由
/blog/:name -> 匹配 /blog/dog 和 /blog/cat
Stream Proxy
APISIX 可以对 TCP/UDP 协议进行代理并实现动态负载均衡
在 nginx 世界,称 TCP/UDP 代理为 Stream Proxy
每当 APISIX 服务器 127.0.0.10 和端口 9101 收到连接时,它只会将请求转发到 mysql 上游
1 2 3 4 5 6 7 8 9 10 11 $ curl http: { "server_addr" : "127.0.0.10" , "server_port" : 9101 , "upstream" : { "nodes" : { "127.0.0.1:3306" : 1 } , "type" : "roundrobin" } } '
Certificate
支持通过 TLS 扩展 SNI 实现加载特定的 SSL 证书以实现对 https 的支持
SNI
允许客户端在服务器端向其发送证书之前向服务器端发送请求的域名,服务器端根据客户端请求的域名选择合适的 SSL 证书发送给客户端